Turn on suggestions
Auto-suggest helps you quickly narrow down your search results by suggesting possible matches as you type.
Showing results for
- Good Sam Community
- Groups
- Travel Trailer Group
- Forum
- Re: Finally Getting Started: New Garage With RV Ba...
Options
- Subscribe to RSS Feed
- Mark Topic as New
- Mark Topic as Read
- Float this Topic for Current User
- Bookmark
- Subscribe
- Mute
- Printer Friendly Page
Finally Getting Started: New Garage With RV Bay
Options
- Mark as New
- Bookmark
- Subscribe
- Mute
- Subscribe to RSS Feed
- Permalink
- Report Inappropriate Content
Feb-15-2013 05:26 PM
I've been talking and thinking about doing this for 3-4 years now. Two days ago we finally took the first "ground breaking" step toward making it a reality.
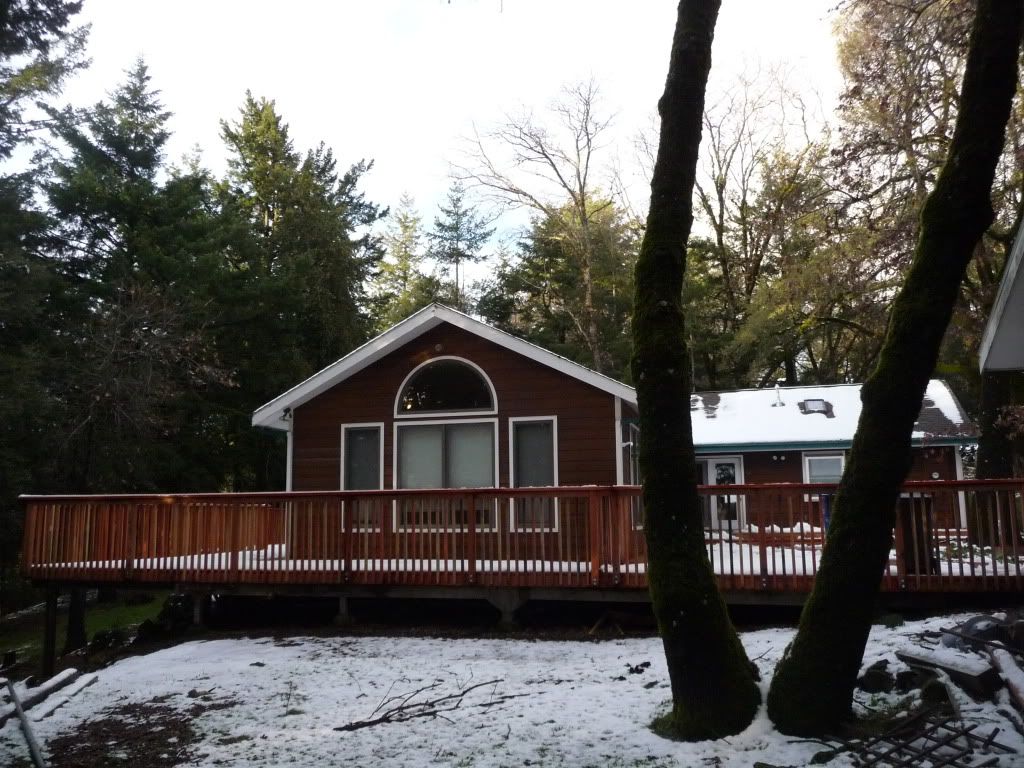
The garage on my house started out as a flat-roof, open-sided carport when the the house was built 40 years ago. Some previous owner put sides on it, but no garage doors. When I bought the place 15 years ago, the flat roof was leaking badly, and the front wall where the two openings are was rotted badly enough that I had to rebuild it before having garage doors installed.
While the house foundation is sound, the garage foundation has had numerous problems from cracking and movement. I've always planned to one day tear it down to the ground and start over. My original plan was to just rebuild a two-bay garage of the same size, but with a peaked roof. Eventually, I realized that by making use of the slope, a tall RV bay could be added without ending up with a roof-line taller than the rest of the house.
Discussing the project with the DW resulted in further "scope creep", such that we'll also be adding a fair amount of square footage to the living area of the house as well. My garage/RV bay/man-cave has ballooned considerably since I first started dreaming, but this is what we've settled on. The old garage is about 28' deep, and 24' wide. The new garage will be 30' deep and 60' wide. The RV bay will have one wide door, rather than the two narrow doors shown. I was planning to allow 14' of vertical clearance, but I'm not sure I really need to go that high. Twelve feet would be plenty for my camper, the garage depth and driveway approach will never accommodate an RV much longer than mine.

About 10 years ago I had an asphalt driveway paved down behind the house, and then had a Jamar RV shed constructed over it where I'm currently parking my truck and camper. It's sitting right where my new garage RV bay will be, so it'll have to be moved. That's what we've started, which doesn't sound too difficult. Except.........

My property is on the side of a hill. There's no naturally level ground anywhere, so a pad will have to be constructed. Also, about a year ago (anticipating the loss of my garage and the storage space inside it) I constructed a 12'x20' storage building right next to the house to hold all of my man-stuff while the garage is being built. Once the garage is built, the storage building will be taken apart and moved farther away from the house. So that's two level pads to construct.


I also have a ton of trees on my property, mostly white oak, some of them pretty big, and pretty close to the house. Of course, there are trees in the way of everything I want to do.
So, Wednesday morning, bright and early, the tree cutting pro's got started. The weather was gray and gloomy that day. This is where my metal RV shed will be moved. I'm going to reduce it's height a little and use it to park other equipment under.

Getting the boom truck setup for another tree.


They were having fun maneuvering that 2WD boom truck around on my slope.

This tree was hanging over my RV shed.


My storage building. They dropped a big limb on it's roof, but it doesn't appear to have suffered any damage.

My truck and camper out of harms way in the front yard.

Wish I had one of those trucks to play with.


Pulling one down close to the power lines.

I'm saving these for another project.

I'll add more as we make progress.
:):)
The garage on my house started out as a flat-roof, open-sided carport when the the house was built 40 years ago. Some previous owner put sides on it, but no garage doors. When I bought the place 15 years ago, the flat roof was leaking badly, and the front wall where the two openings are was rotted badly enough that I had to rebuild it before having garage doors installed.
While the house foundation is sound, the garage foundation has had numerous problems from cracking and movement. I've always planned to one day tear it down to the ground and start over. My original plan was to just rebuild a two-bay garage of the same size, but with a peaked roof. Eventually, I realized that by making use of the slope, a tall RV bay could be added without ending up with a roof-line taller than the rest of the house.
Discussing the project with the DW resulted in further "scope creep", such that we'll also be adding a fair amount of square footage to the living area of the house as well. My garage/RV bay/man-cave has ballooned considerably since I first started dreaming, but this is what we've settled on. The old garage is about 28' deep, and 24' wide. The new garage will be 30' deep and 60' wide. The RV bay will have one wide door, rather than the two narrow doors shown. I was planning to allow 14' of vertical clearance, but I'm not sure I really need to go that high. Twelve feet would be plenty for my camper, the garage depth and driveway approach will never accommodate an RV much longer than mine.
About 10 years ago I had an asphalt driveway paved down behind the house, and then had a Jamar RV shed constructed over it where I'm currently parking my truck and camper. It's sitting right where my new garage RV bay will be, so it'll have to be moved. That's what we've started, which doesn't sound too difficult. Except.........
My property is on the side of a hill. There's no naturally level ground anywhere, so a pad will have to be constructed. Also, about a year ago (anticipating the loss of my garage and the storage space inside it) I constructed a 12'x20' storage building right next to the house to hold all of my man-stuff while the garage is being built. Once the garage is built, the storage building will be taken apart and moved farther away from the house. So that's two level pads to construct.
I also have a ton of trees on my property, mostly white oak, some of them pretty big, and pretty close to the house. Of course, there are trees in the way of everything I want to do.
So, Wednesday morning, bright and early, the tree cutting pro's got started. The weather was gray and gloomy that day. This is where my metal RV shed will be moved. I'm going to reduce it's height a little and use it to park other equipment under.
Getting the boom truck setup for another tree.
They were having fun maneuvering that 2WD boom truck around on my slope.
This tree was hanging over my RV shed.
My storage building. They dropped a big limb on it's roof, but it doesn't appear to have suffered any damage.
My truck and camper out of harms way in the front yard.
Wish I had one of those trucks to play with.
Pulling one down close to the power lines.
I'm saving these for another project.
I'll add more as we make progress.
:):)
2001 Lance 1121 on a 2016 F450 ‘Scuse me while I whinge.
And for all you Scooby-Doo and Yosemite Sam types………..Let’s Go Brandon!!!
And for all you Scooby-Doo and Yosemite Sam types………..Let’s Go Brandon!!!
Labels:
- Labels:
-
Truck Campers
274 REPLIES 274
Options
- Mark as New
- Bookmark
- Subscribe
- Mute
- Subscribe to RSS Feed
- Permalink
- Report Inappropriate Content
Oct-31-2013 04:56 AM
Thank You,
I regularly looked out for your postings & pictures.
Now, you need some TC trips, to relax, and get away, down south to warm up,
and some photo's even.
Maybe even come down to Australia in our summer, your winter? Eyres Rock, Kakadu, Bungle Bungles & Sydney Opera House, Bondi & The Blue Mountains.
Good Luck, Doug...
2012 Ram 4x4 Crew Laramie LB 3500 HO Auto diesel
Eagle Cap 1160 Super Springs Big Wig Sway Bar Front Timbrens, Fastguns
RearCam SolarPnl Expdtion Shvel/Axe Kit
Thermopane Windows,, Dcted Heat & R/cycle aircon
Genset WoblStopprs
Eagle Cap 1160 Super Springs Big Wig Sway Bar Front Timbrens, Fastguns
RearCam SolarPnl Expdtion Shvel/Axe Kit
Thermopane Windows,, Dcted Heat & R/cycle aircon
Genset WoblStopprs
Options
- Mark as New
- Bookmark
- Subscribe
- Mute
- Subscribe to RSS Feed
- Permalink
- Report Inappropriate Content
Oct-31-2013 04:34 AM
Before this drifts too far down on the forum, I want to extend my sincere thanks to everyone who posted their comments, suggestions, ideas, or just encouragement over the past 6-8 months. It was very much appreciated, and was one of the things that made the project more enjoyable for me. There were several times throughout the course of this project that a solution or detail came straight from a member of this forum.
I probably don't have to tell you all this, but there were more than a few times that I questioned our sanity in doing this. There were so many unforeseen issues to deal with, and many that were known about beforehand were underestimated. But....... once we had the old garage torn down there was nothing else that could be done except build a new one.
It's good to have all the major destruction behind us now, and to finally be getting the yard back into a state where it doesn't look so............... damaged. All of the piles of debris that had accumulated are gone now, thank goodness. We can finally keep the inside of our house clean(er) again without all the dirt and dust just immediately covering everything.
There's still a lot of work to do though, and I'll try to keep this updated often enough that it doesn't automatically close. Especially if I do something noteworthy in the RV bay. I have a lot of ideas and plans for that area, but I'm not sure how quickly I can make them happen.
I also need to spend some time this winter working on the camper. The lower side panels at the rear of the camper (sometimes called the "skirts") need to be replaced. The wood behind the filon has been getting soft down at the bottom edge for the past few years, and is now to the point that the edge trim screws are falling out. I bought the panels from Lance about 3 years ago, but just haven't been able to make myself tear into it during camping season to replace them. Now that I have a place to work out of the weather, I should be able to get started after Thanksgiving. I did do one thing about a year ago that might help the new panels last a little longer: I covered all the raw wood and luan with several coats of spar urethane. We'll see how that works out. I may start a new topic to document that rebuild.
Again, thank you to all who posted. Thank you also to those who just followed along. The number of views this topic has received is amazing to me, and is an indication that it was apparently of interest to many more than just those that posted comments. That was my goal all along...... to keep you all entertained! :B
:):)
2001 Lance 1121 on a 2016 F450 ‘Scuse me while I whinge.
And for all you Scooby-Doo and Yosemite Sam types………..Let’s Go Brandon!!!
And for all you Scooby-Doo and Yosemite Sam types………..Let’s Go Brandon!!!
Options
- Mark as New
- Bookmark
- Subscribe
- Mute
- Subscribe to RSS Feed
- Permalink
- Report Inappropriate Content
Oct-27-2013 04:39 PM
I wouldn't change a thing... not the placement of a single nail.
If you ever need a modification you have the skills and the experience to make it.
Congratulations.... for a job well done!
Chet
If you ever need a modification you have the skills and the experience to make it.
Congratulations.... for a job well done!
Chet
2003 Lance 1161,/slideout/AGM batteries/255W Solar/propane generator/Sat dish/2 Fantastic Fans/AC/winter pkg
AirFoil, Trimetric, LED lights, Platcat vent heat
2003GMC K3500 LT/Crewcab/duramax diesel/allison/dually/4x4/OnStar/front reciever mounted spare
AirFoil, Trimetric, LED lights, Platcat vent heat
2003GMC K3500 LT/Crewcab/duramax diesel/allison/dually/4x4/OnStar/front reciever mounted spare
Options
- Mark as New
- Bookmark
- Subscribe
- Mute
- Subscribe to RSS Feed
- Permalink
- Report Inappropriate Content
Oct-25-2013 07:31 PM
Yeah, I knew about the baby head rule, but vertical balusters spaced that close together just wasn't the look I wanted in there. I think I really would install clear panels before I'd do that.
I thought the 2x6's standing on edge would provide the finger hold on the handrail though. The portion sticking up above the 2x4's laying on top of the 4x4 supports is about 2x2. I actually stole that design from a handrail inside the house. I was specifically thinking of my Father and FIL using those stairs when I built them. They both need two handrails for support.
I hope there weren't any serious code deficiencies. PM me if you want. When I compare what I built to the rest of the house where most of the living area is, I think overall it's more compliant. For example, I could make those stairs and railings in the garage code compliant (and less attractive in the process), but the spiral stairs inside the house that kids are more likely to use would still have balusters spaced so far apart I could fit between them.
I also hope I haven't left anyone with the impression that I live in a lawless area, because I don't. It's not even what most would consider remote. It is isolated from the rest of the community I live in because of what's around it though, and there are advantages and disadvantages to that. Being unnoticed and therefore left alone is an advantage. Not having access to some municipal services is a disadvantage.
:):)
2001 Lance 1121 on a 2016 F450 ‘Scuse me while I whinge.
And for all you Scooby-Doo and Yosemite Sam types………..Let’s Go Brandon!!!
And for all you Scooby-Doo and Yosemite Sam types………..Let’s Go Brandon!!!
Options
- Mark as New
- Bookmark
- Subscribe
- Mute
- Subscribe to RSS Feed
- Permalink
- Report Inappropriate Content
Oct-25-2013 06:32 PM
bka0721 wrote:NRALIFR wrote:Buzzcut and I were on the same page, but approached it differently. The grit in the finish will last a lot longer, not roll up and peel off, or look weird as it gets worn out. You can add more or less grit to the finish material and it is available in most paint departments, especially the Lowes and Home Depot. I used it in my Motorcycle trailer, that I am pulling behind my Truck Camper. Have used the substance for years on deck steps when I built decks. As it wears thin, as do finishes, brush in some more as you put a new finish on.Buzzcut1 wrote:
The one thing I would do is apply grip tape to the stairs. Wet boots, mud, and wood can be slick as hell. I speak from experience on slip and fall on wood stairs not so funny slapstick routine.
Very good point. I haven't done it yet, but I hope to start putting a clear finish on the steps soon. bka0721 made the suggestion of adding some grit to the final coat on the stair treads to add some traction. I'll do one or the other, as I'm finding out lately that I'm not quite as indestructible as I used to be.
:):)
As for the Hand rails, you have actually two issues for code. The baby head rule (Vertical Balusters to prevent children from falling through hand rails) which UBC typically requires when a surface is more then 30" off the ground and the Finger Hold (Whish is usually a concave cut into the railing or a 2X2 attached to the railing to allow small and elderly people to grip the railing), I didn't mention this before as there are a number of things that are not to code in the construction of your project, which is not that unusual in some areas, so I suspected that. I agree with you, police your area yourself.
As for the children doing unexpected things. In 1989, I responded to a report of a child injured in a fall in a Coal Creek Canyon mountain Sub division (Colorado). When I arrived, I saw a U=Haul truck in the driveway, in front of the garage, that was a two story portion of the house. The Master bedroom was over the garage, with a fairly large deck cantilevered out over the driveway. A young couple, with two children, (4 & 7) were moving into this home. While the parents were getting something out of the moving truck, to move into the house, their youngest had come out on the deck and in the excitement, fell through the railing onto the concrete apron driveway below. He didn't survive the fall. The railing on the deck, was the same single horizontal style rail as yours. So the previous poster, on this thread, does make a good point, as you do too.
I typically choose not to interject scenarios unless it is under discussion by others. For me, you are doing a great job and it is a wonderful project that has excited and inspired others to contemplate doing something for themselves.
b
when I rebuilt the deck on my old house I had to put vertical 2"x 2"s spaced with less than 4" gaps deck to handrail once I exceeded 18" above ground.
2011 F350 6.7L Diesel 4x4 CrewCab longbed Dually, 2019 Lance 1062, Torqlift Talons, Fast Guns, upper and lower Stable Loads, Super Hitch, 48" Super Truss, Airlift loadlifter 5000 extreme airbags
Options
- Mark as New
- Bookmark
- Subscribe
- Mute
- Subscribe to RSS Feed
- Permalink
- Report Inappropriate Content
Oct-25-2013 05:33 PM
NRALIFR wrote:Buzzcut and I were on the same page, but approached it differently. The grit in the finish will last a lot longer, not roll up and peel off, or look weird as it gets worn out. You can add more or less grit to the finish material and it is available in most paint departments, especially the Lowes and Home Depot. I used it in my Motorcycle trailer, that I am pulling behind my Truck Camper. Have used the substance for years on deck steps when I built decks. As it wears thin, as do finishes, brush in some more as you put a new finish on.Buzzcut1 wrote:
The one thing I would do is apply grip tape to the stairs. Wet boots, mud, and wood can be slick as hell. I speak from experience on slip and fall on wood stairs not so funny slapstick routine.
Very good point. I haven't done it yet, but I hope to start putting a clear finish on the steps soon. bka0721 made the suggestion of adding some grit to the final coat on the stair treads to add some traction. I'll do one or the other, as I'm finding out lately that I'm not quite as indestructible as I used to be.
:):)
As for the Hand rails, you have actually two issues for code. The baby head rule (Vertical Balusters to prevent children from falling through hand rails) which UBC typically requires when a surface is more then 30" off the ground and the Finger Hold (Whish is usually a concave cut into the railing or a 2X2 attached to the railing to allow small and elderly people to grip the railing), I didn't mention this before as there are a number of things that are not to code in the construction of your project, which is not that unusual in some areas, so I suspected that. I agree with you, police your area yourself.
As for the children doing unexpected things. In 1989, I responded to a report of a child injured in a fall in a Coal Creek Canyon mountain Sub division (Colorado). When I arrived, I saw a U=Haul truck in the driveway, in front of the garage, that was a two story portion of the house. The Master bedroom was over the garage, with a fairly large deck cantilevered out over the driveway. A young couple, with two children, (4 & 7) were moving into this home. While the parents were getting something out of the moving truck, to move into the house, their youngest had come out on the deck and in the excitement, fell through the railing onto the concrete apron driveway below. He didn't survive the fall. The railing on the deck, was the same single horizontal style rail as yours. So the previous poster, on this thread, does make a good point, as you do too.
I typically choose not to interject scenarios unless it is under discussion by others. For me, you are doing a great job and it is a wonderful project that has excited and inspired others to contemplate doing something for themselves.
b
08 F550-4X4-CC-6.4L Dsl-206"WB GVWR17,950#
09 Lance 1191
1,560wSolar~10-6vGC2-1,160AmpH~Tri-Star-Two(2)60/MPPT~Xantrex 2000W
300wSolar~2-6vAGM-300AmpH~Tri-Star45/MPPT~Xantrex 1500W
16 BMW R1200GSW Adventure
16 KTM 500 EXC
06 Honda CRF450X
09 Haulmark Trlr
09 Lance 1191
1,560wSolar~10-6vGC2-1,160AmpH~Tri-Star-Two(2)60/MPPT~Xantrex 2000W
300wSolar~2-6vAGM-300AmpH~Tri-Star45/MPPT~Xantrex 1500W
16 BMW R1200GSW Adventure
16 KTM 500 EXC
06 Honda CRF450X
09 Haulmark Trlr
Options
- Mark as New
- Bookmark
- Subscribe
- Mute
- Subscribe to RSS Feed
- Permalink
- Report Inappropriate Content
Oct-25-2013 04:59 PM
Buzzcut1 wrote:
The one thing I would do is apply grip tape to the stairs. Wet boots, mud, and wood can be slick as hell. I speak from experience on slip and fall on wood stairs not so funny slapstick routine.
Very good point. I haven't done it yet, but I hope to start putting a clear finish on the steps soon. bka0721 made the suggestion of adding some grit to the final coat on the stair treads to add some traction. I'll do one or the other, as I'm finding out lately that I'm not quite as indestructible as I used to be.
:):)
2001 Lance 1121 on a 2016 F450 ‘Scuse me while I whinge.
And for all you Scooby-Doo and Yosemite Sam types………..Let’s Go Brandon!!!
And for all you Scooby-Doo and Yosemite Sam types………..Let’s Go Brandon!!!
Options
- Mark as New
- Bookmark
- Subscribe
- Mute
- Subscribe to RSS Feed
- Permalink
- Report Inappropriate Content
Oct-25-2013 04:49 PM
The one thing I would do is apply grip tape to the stairs. Wet boots, mud, and wood can be slick as hell. I speak from experience on slip and fall on wood stairs not so funny slapstick routine.
2011 F350 6.7L Diesel 4x4 CrewCab longbed Dually, 2019 Lance 1062, Torqlift Talons, Fast Guns, upper and lower Stable Loads, Super Hitch, 48" Super Truss, Airlift loadlifter 5000 extreme airbags
Options
- Mark as New
- Bookmark
- Subscribe
- Mute
- Subscribe to RSS Feed
- Permalink
- Report Inappropriate Content
Oct-25-2013 04:34 PM
livingaboard wrote:
Looks good so far. The one thing I would be concerned with are the stairs. The spacing certainly isn't going to meet code which won't really matter unless you are selling the house or if you have small children over. Kids can easily fall through.
By "spacing" are you referring to the rise of each step, or the spacing of the side rails?
The rise is only 7" on each step, but if you're referring to the spacing of the side rails, if those aren't compliant then I would guess my steel pipe railing isn't either.
We don't have small children over much, but I have given some thought to their safety (and our liability). But when we do, I'll just make the garage off-limits to unsupervised ankle-biters. I have to do the same thing with the "old enough to know better" ATV'ers that think the power-line easement that runs across my land is public property.
I'm open to reasonable design changes that don't block the view if you have any ideas. I suppose some Lexan panels could be fastened to the railing if we did have kids here a lot. But, even if the rails were 100% child safe there would still be plenty of dangerous stuff in the garage that I wouldn't want them playing around.
:):)
2001 Lance 1121 on a 2016 F450 ‘Scuse me while I whinge.
And for all you Scooby-Doo and Yosemite Sam types………..Let’s Go Brandon!!!
And for all you Scooby-Doo and Yosemite Sam types………..Let’s Go Brandon!!!
Options
- Mark as New
- Bookmark
- Subscribe
- Mute
- Subscribe to RSS Feed
- Permalink
- Report Inappropriate Content
Oct-24-2013 08:25 PM
Looks good so far. The one thing I would be concerned with are the stairs. The spacing certainly isn't going to meet code which won't really matter unless you are selling the house or if you have small children over. Kids can easily fall through.
Dave
Everett, WA
2000 Itasca Suncruiser 35U, F53 Triton V-10
Firestone air bags with Quad control air gauge
Pressure Pro tire pressure monitor
Banks Exhaust
SuperSteer rear trac bar
Olympian Wave heaters (Wall mount and portable)
Everett, WA
2000 Itasca Suncruiser 35U, F53 Triton V-10
Firestone air bags with Quad control air gauge
Pressure Pro tire pressure monitor
Banks Exhaust
SuperSteer rear trac bar
Olympian Wave heaters (Wall mount and portable)
Options
- Mark as New
- Bookmark
- Subscribe
- Mute
- Subscribe to RSS Feed
- Permalink
- Report Inappropriate Content
Oct-14-2013 04:22 PM
(1)what I lack in skills, I make up for in having a nearly unlimited amount of time to fiddle around with a project (2)until I get it right.
I resemble part 1 of that comment; part 2 is sometimes a matter of debate.
Cal
Options
- Mark as New
- Bookmark
- Subscribe
- Mute
- Subscribe to RSS Feed
- Permalink
- Report Inappropriate Content
Oct-14-2013 03:17 PM
Sparky87k5 wrote:
You do nice work. There must be some "carpenter" in your background. Also love your ball cap. Stairs look very strong and safe. Storage for camping gear in boxes could be stored under stairs? Dead storage area?
Thanks. My Dad is a pretty good wood worker so I acquired a lot of my skills by watching him, and I've always paid close attention to any pro's I've had the good fortune to spend time around. I've always felt though that what I lack in skills, I make up for in having a nearly unlimited amount of time to fiddle around with a project until I get it right. I wouldn't want to pay me by the hour! :W
Some of my elderly family members who might use these stairs need the security of the two sturdy handrails, the deep treads and comfortable rises. I hope they appreciate the amount of thought and work that went into them. :B
bka0721 wrote:
Looks good. For that length of span, you would not have needed the extra center posts, but it certainly stabilizes that much more.
A poly coat should be fine. With a painted or stained covering, you would have wear and tear, with maintenance. I would suggest you consider using satin or semi gloss, as gloss will present additional maintenance as it wears. One thing I would strongly suggest is an abrasive additive that is available for mixing into paint/stain/polyurethane. It is available in most paint stores and Home Depot/Lowes. It is basically a sand material that will provide a rough surface, thus giving a more secure surface for walking on. As you coat your new stairs, wait to the final coat of the treads and add the abrasive additive to the remaining material and use it only on the tread surface.
Great thread and pictures.
b
Good advice, thank you! It so happens that I've got about a half-gallon of satin spar urethane in my paint cabinet, so that may be what I use. I really appreciate the suggestion of the sand additive. I hadn't thought of that, but sounds like a good thing to do.
:):)
2001 Lance 1121 on a 2016 F450 ‘Scuse me while I whinge.
And for all you Scooby-Doo and Yosemite Sam types………..Let’s Go Brandon!!!
And for all you Scooby-Doo and Yosemite Sam types………..Let’s Go Brandon!!!
Options
- Mark as New
- Bookmark
- Subscribe
- Mute
- Subscribe to RSS Feed
- Permalink
- Report Inappropriate Content
Oct-14-2013 10:09 AM
Looks good. For that length of span, you would not have needed the extra center posts, but it certainly stabilizes that much more.
A poly coat should be fine. With a painted or stained covering, you would have wear and tear, with maintenance. I would suggest you consider using satin or semi gloss, as gloss will present additional maintenance as it wears. One thing I would strongly suggest is an abrasive additive that is available for mixing into paint/stain/polyurethane. It is available in most paint stores and Home Depot/Lowes. It is basically a sand material that will provide a rough surface, thus giving a more secure surface for walking on. As you coat your new stairs, wait to the final coat of the treads and add the abrasive additive to the remaining material and use it only on the tread surface.
Great thread and pictures.
b
08 F550-4X4-CC-6.4L Dsl-206"WB GVWR17,950#
09 Lance 1191
1,560wSolar~10-6vGC2-1,160AmpH~Tri-Star-Two(2)60/MPPT~Xantrex 2000W
300wSolar~2-6vAGM-300AmpH~Tri-Star45/MPPT~Xantrex 1500W
16 BMW R1200GSW Adventure
16 KTM 500 EXC
06 Honda CRF450X
09 Haulmark Trlr
09 Lance 1191
1,560wSolar~10-6vGC2-1,160AmpH~Tri-Star-Two(2)60/MPPT~Xantrex 2000W
300wSolar~2-6vAGM-300AmpH~Tri-Star45/MPPT~Xantrex 1500W
16 BMW R1200GSW Adventure
16 KTM 500 EXC
06 Honda CRF450X
09 Haulmark Trlr
Options
- Mark as New
- Bookmark
- Subscribe
- Mute
- Subscribe to RSS Feed
- Permalink
- Report Inappropriate Content
Oct-14-2013 07:27 AM
You do nice work. There must be some "carpenter" in your background. Also love your ball cap. Stairs look very strong and safe. Storage for camping gear in boxes could be stored under stairs? Dead storage area?
2000 F350 Lariat LE V10 CC LB 4WD DRW
2005 Eagle Cap 850 Camper
1993 Robalo 2440 twin '07 Merc Optimax 150's
1978 Glasply 28' with twin 310hp V8's
2005 Eagle Cap 850 Camper
1993 Robalo 2440 twin '07 Merc Optimax 150's
1978 Glasply 28' with twin 310hp V8's
Options
- Mark as New
- Bookmark
- Subscribe
- Mute
- Subscribe to RSS Feed
- Permalink
- Report Inappropriate Content
Oct-13-2013 05:17 PM
I got some proper lights installed on the outside of the garage since my last update. Those temporary lights were starting to look normal to me, so I knew I better get the right ones put up there soon.

That's better than those bare bulbs that were hanging there.

And............drum-roll please........I finally built some stairs going down to the lower bay. No more ladder climbing, yea!
I'd never built stairs before, so I had to think about it for a while to get the design figured out. There are stair calculators available on the web that help you laying out the stringers, but the overall design was what I had to get straight in my head before I could get started. Also, building stairs up against concrete is a little different than against a wooden structure so I had to get that figured out as well.
I needed to get the concrete and cinder block walls primed and sealed in that corner before I could build against them, so that was the first step. Since there were no headroom or run length limitations, I only had to supply the stair calculator with the total rise and tread thickness dimensions to get the stringer layout. It was raining the day I cut the stringers so I was working inside, using the truck bed as a workbench. That's my laptop sitting on the 2x12 I'm consulting.

I got three stringers layed out and cut. I didn't plan on having a riser board, but after mounting the stringers I decided they needed some blocking between them to reduce their ability to twist, especially the outside stringer that will have two 4x4's attached to it to support the hand-rail. And, I needed the handrail on the cinder-block wall side to stand away from the wall to allow clearance for sheet-rock (or whatever) in the future. The 4x4's against the concrete and cinder blocks are anchored to the walls with Tapcon bolts and construction adhesive. These stairs are going to be sturdy!

I cut some blocking out of 2x12 and mounted them between the stringers, every other step. Had to use my pipe clamps to hold things together while I screwed them.

This is how they turned out. There are 12 rises of 7". The treads are all 10-1/2" including the 1/2" of nosing.

The edges of all the step and handrail boards have been eased to a soft curve with a router and sander.

The width of the stair opening from the upper bay had been set months ago, so I used the whole width available. If I had made the stairs narrower, there would have been a large gap between the stair handrail and the steel pipe rail on top of the concrete wall. Not good for small children.

So, what kind of clear finish do I put on the white wood? Polyurethane? The 4x4's are too wet to put anything on right now.
And, what do I use that area under the stairs for?

:):)
That's better than those bare bulbs that were hanging there.
And............drum-roll please........I finally built some stairs going down to the lower bay. No more ladder climbing, yea!
I'd never built stairs before, so I had to think about it for a while to get the design figured out. There are stair calculators available on the web that help you laying out the stringers, but the overall design was what I had to get straight in my head before I could get started. Also, building stairs up against concrete is a little different than against a wooden structure so I had to get that figured out as well.
I needed to get the concrete and cinder block walls primed and sealed in that corner before I could build against them, so that was the first step. Since there were no headroom or run length limitations, I only had to supply the stair calculator with the total rise and tread thickness dimensions to get the stringer layout. It was raining the day I cut the stringers so I was working inside, using the truck bed as a workbench. That's my laptop sitting on the 2x12 I'm consulting.
I got three stringers layed out and cut. I didn't plan on having a riser board, but after mounting the stringers I decided they needed some blocking between them to reduce their ability to twist, especially the outside stringer that will have two 4x4's attached to it to support the hand-rail. And, I needed the handrail on the cinder-block wall side to stand away from the wall to allow clearance for sheet-rock (or whatever) in the future. The 4x4's against the concrete and cinder blocks are anchored to the walls with Tapcon bolts and construction adhesive. These stairs are going to be sturdy!
I cut some blocking out of 2x12 and mounted them between the stringers, every other step. Had to use my pipe clamps to hold things together while I screwed them.
This is how they turned out. There are 12 rises of 7". The treads are all 10-1/2" including the 1/2" of nosing.
The edges of all the step and handrail boards have been eased to a soft curve with a router and sander.
The width of the stair opening from the upper bay had been set months ago, so I used the whole width available. If I had made the stairs narrower, there would have been a large gap between the stair handrail and the steel pipe rail on top of the concrete wall. Not good for small children.
So, what kind of clear finish do I put on the white wood? Polyurethane? The 4x4's are too wet to put anything on right now.
And, what do I use that area under the stairs for?
:):)
2001 Lance 1121 on a 2016 F450 ‘Scuse me while I whinge.
And for all you Scooby-Doo and Yosemite Sam types………..Let’s Go Brandon!!!
And for all you Scooby-Doo and Yosemite Sam types………..Let’s Go Brandon!!!


