Turn on suggestions
Auto-suggest helps you quickly narrow down your search results by suggesting possible matches as you type.
Showing results for
- Good Sam Community
- Groups
- Travel Trailer Group
- Forum
- Roof Collapse around A/C - Now leaking
Options
- Subscribe to RSS Feed
- Mark Topic as New
- Mark Topic as Read
- Float this Topic for Current User
- Bookmark
- Subscribe
- Mute
- Printer Friendly Page
Roof Collapse around A/C - Now leaking
Options
- Mark as New
- Bookmark
- Subscribe
- Mute
- Subscribe to RSS Feed
- Permalink
- Report Inappropriate Content
Oct-19-2014 01:44 PM
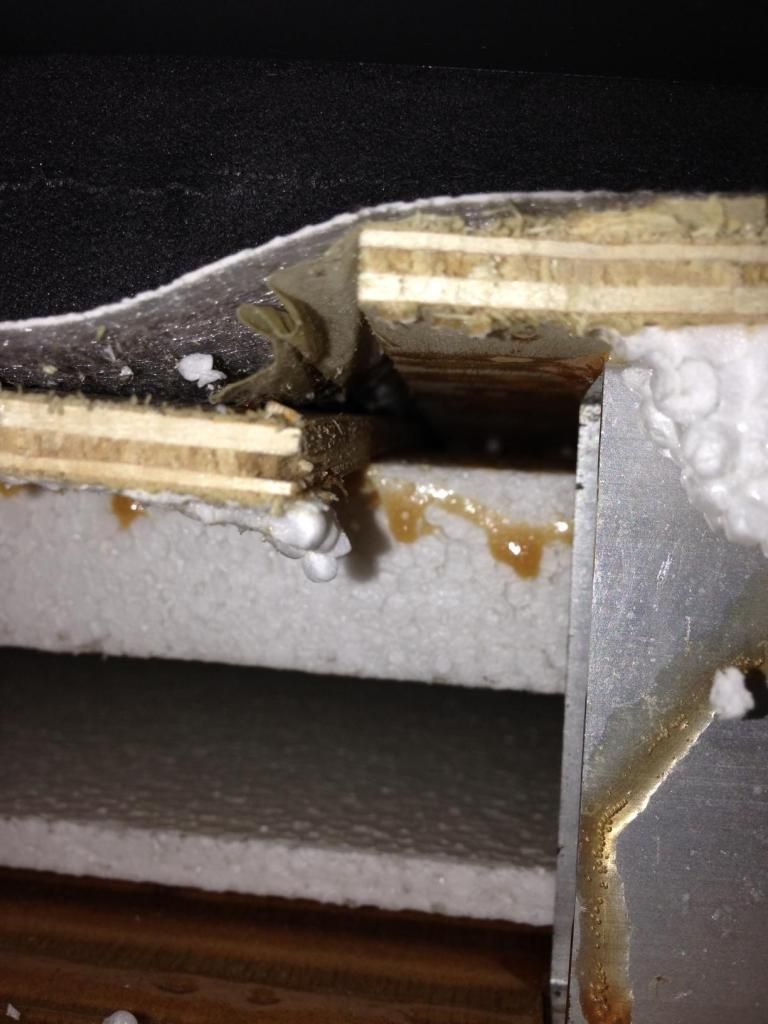
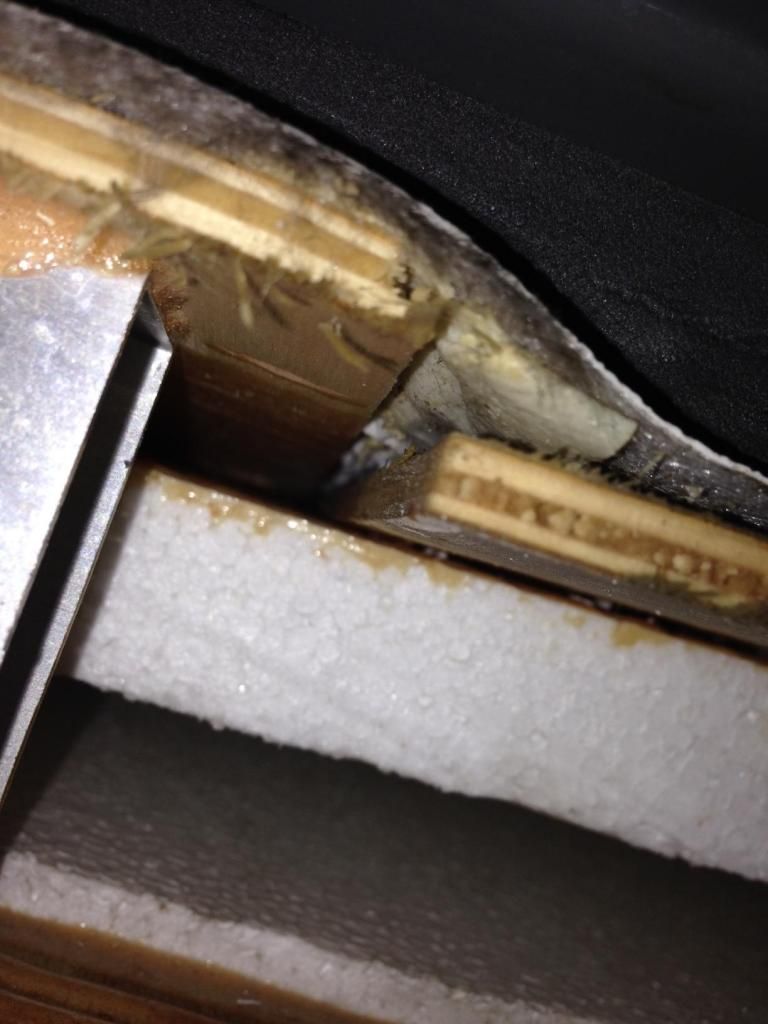
We've purchased our Rockwood TT new 7 years ago. We have been very happy. We were at Halloween campout this weekend in the rain and had a substantial leak at the air conditioner. I took off the cover and found the roof is collapsing on both sides at the joint. I am really scratching my head because I can't figure out what structure was suppose to keep this from happening. It almost seems like this was a manufacturing defect. There is nothing that would hold the joints together between adjacent pieces of plywood. The plywood holding the most weight has given way and now the seal is leaking. This happened on both sides.
Has anyone seen this before? Any idea how to fix it? I am stumped.
Has anyone seen this before? Any idea how to fix it? I am stumped.
'06 Sequoia
Rockwood 2501SS, 5100 lbs dry, 5700 loaded
Primus Brake Controller
Remanufactured Hensley Cub Hitch
Rockwood 2501SS, 5100 lbs dry, 5700 loaded
Primus Brake Controller
Remanufactured Hensley Cub Hitch
32 REPLIES 32
Options
- Mark as New
- Bookmark
- Subscribe
- Mute
- Subscribe to RSS Feed
- Permalink
- Report Inappropriate Content
Oct-22-2014 02:48 AM
If you do as westend suggested and you use good quality adhesive, once it sets you may find you do not need fasteners along the new rafter, only on the ends where the box frames the hole to hold it in place while the adhesive sets. Modern adhesives are stronger than the material they adhere.
:E [purple]I ride it like I stole it![/purple] :B
2004 Fun Mover with a 1998 Road King and a 2002 Sportster tucked in the garage, Dragging a 2002 "RAM Tough" Dodge Dakota Crew Cab. Ohhh what a haul!
TSgt(Ret.) USAF
.......and I just may have.......
I'm on "CB-13", are you?
2004 Fun Mover with a 1998 Road King and a 2002 Sportster tucked in the garage, Dragging a 2002 "RAM Tough" Dodge Dakota Crew Cab. Ohhh what a haul!
TSgt(Ret.) USAF
Options
- Mark as New
- Bookmark
- Subscribe
- Mute
- Subscribe to RSS Feed
- Permalink
- Report Inappropriate Content
Oct-21-2014 09:15 PM
Any half-way decent carpenter (I count myself in this group) would tell you that sheathing is never installed without the joints supported.
It's difficult to get perspective from the close-up pictures but I will assume that the unsupported sheathing joint runs from side to side. Even if the opposite is the case, the cure is the same.
Here is what I would do: What the intention is, is to install a roof rafter underneath the length of the unsupported joint. It appears that the unsupported joint is a few inches from one existing roof rafter and a greater distance from another. I would first cut apiece of lumber that is the same dimension as the existing rafters. For this discussion lets call that 3 1/2", the dimension of a standard 2 x 4. I would estimate that the length of the unsupported joint is around 3' (8' width less 2' cutout). What ever it is, cut the new 2 x 4 rafter 1 1/2" less than that 1/2 span.
*Here comes the tricky part*--measure the offset from each existing rafter to the unsupported joint. On your new rafter piece attach filler blocks on the narrow offset side (one each end and one in the middle). On the side of the new rafter that faces the larger off set, make a triangle that will span about 2/3 of the distance of the new rafter, the height of the triangle being the same as the off set less 1/8" or so and the 3/4" to center of the new rafter and attach that so the peak of the triangle is at centerpoint of your new rafter (1 x 3 would be my material of choice for this triangle). You should now have a new rafter that has three blocks on one side and a triangle attached to the other side. Fill the triangle, the spaces around the triangle, and space between the blocks with insulation (I'll let you figure out how to do this). Put glue on the top and bottom edge of your new rafter, on the blocks, and anywhere else the rafter assembly will make contact and slide it under the unsupported joint. you should now have a rafter under the joint except for the last 1 1/2" adjacent to the hole. Cut another rafter sized piece, the length of the AC cutout and attach that in the same manner, including fasteners that attach to the new rafter. Repeat rafter installation on the other side and box in the remaining two sides of the cutout hole. You may feel it's necessary to run fasteners in from the top and bottom but I would forgo that until you estimate the strength of what results without them.
If you wish to know my mailing address to send the $4490 or wish to have a drawing, send me a PM. :B Good luck with the roof.
Edut: Forgot to mention---If the AC cut out area has a dip towards the floor, jack and brace the ceiling on both sides before installing new rafters and box. I used a "T" made of 2x4 and a bottle jack to raise my ceiling for rafter installation.
'03 F-250 4x4 CC
'71 Starcraft Wanderstar -- The Cowboy/Hilton
'71 Starcraft Wanderstar -- The Cowboy/Hilton
Options
- Mark as New
- Bookmark
- Subscribe
- Mute
- Subscribe to RSS Feed
- Permalink
- Report Inappropriate Content
Oct-21-2014 06:24 PM
It looks like they cut the AC hole through a joint of two pieces of plywood. It seems like they would not join sheets where they intend to put an opening. Structurally, it just seems like an awful idea. I would attempt to use something lightweight to reinforce the hole such as aluminum angle iron. It won't rust, and it's light enough to not cause any added weight. You you have to remove that AC unit to really see what's up under there. You'll need some help. When I removed mine, it was pretty heavy. It took one man on each side to lift it clear without doing any damage to the rubber roofing.
Options
- Mark as New
- Bookmark
- Subscribe
- Mute
- Subscribe to RSS Feed
- Permalink
- Report Inappropriate Content
Oct-20-2014 02:37 PM
I just took a look at our '08 Rockwood Roo (a hybrid model), but which I'd suspect is quite similar in construction in this area. I removed the plastic interior trim/cover and I find no area in the AC opening that contains a joint between two pieces of luan plywood, it's one piece with a hole cut in it.
On our Roo I had removed the AC unit to replace the gasket a while back. As part of the process, I decided to build up the mounting surface (I'll call it a "curb", you can see it just above the edge of the roofing material in the photo). The curb material is just some trimmed pieces of poplar trim boards. After installing the curb, I caulked and I used Eternabond tape to wrap it and seal it to the roofing.
On Edit: Hmmm... There sould be a picture in this spot. I'm Having trouble with linking photo from Flckr... I give up...
>> Try seeing it here instead... <<
I believe that if the OP could remove the AC unit and install some curbing like we did it might be a simple, but viable solution. I'd suggest the curbing be bonded and then screwed from below where ever possible to rejoin the 2 pieces of luan plywood and provide some form of structural rigidity. It might be a good idea to use some aluminum flat stock from below to help "sandwich" the two pieces of luan together. He'll also need to obtain a new AC gasket and build up (the thickness of the curbing) the few perimeter mounting pads around the steel AC pan.
'05 Chevy Tahoe & ’08 Rockwood Roo 23ss
'62 Myself
'62 Camper Honey
'96 Camper Twin Girls
'62 Myself
'62 Camper Honey
'96 Camper Twin Girls
Options
- Mark as New
- Bookmark
- Subscribe
- Mute
- Subscribe to RSS Feed
- Permalink
- Report Inappropriate Content
Oct-20-2014 01:45 PM
I appreciate all of the ideas! This community is such a wonderful place. I so needed the help and I am feeling much more encouraged now that when I started.
I really believe the wood is dry already but I'll look more closely once the air conditioner is up. I did find a lot more information by searching for "RV roof sag leak." It is not exactly the same problem but the answer proposed in several articles would work here I think. They propose building a second layer of 1/4 plywood to raise the air conditioner to prevent puddling of water near the A/C unit. To do that, they suggest installing two U shaped pieces of plywood that together lift the entire unit 1/4" It is the same concept openspaces suggested but using 1/4 plywood instead of 2x4's and putting it on the top.
http://bryantrv.com/roofacleaks.html
http://rvtravel.com/publish/rvdoctor381.shtml
http://www.motorhome.com/rv-how-to/roof-ac-gasket-replacement/
'06 Sequoia
Rockwood 2501SS, 5100 lbs dry, 5700 loaded
Primus Brake Controller
Remanufactured Hensley Cub Hitch
Rockwood 2501SS, 5100 lbs dry, 5700 loaded
Primus Brake Controller
Remanufactured Hensley Cub Hitch
Options
- Mark as New
- Bookmark
- Subscribe
- Mute
- Subscribe to RSS Feed
- Permalink
- Report Inappropriate Content
Oct-20-2014 01:12 PM
I have been thinking about this overnight...
How about this:
Remove the A/C unit as described in previous post.
Completely dry the plywood if wet or damp.
Get a section of channel iron where the channel is the same thickness as the plywood and the sides are at least 2 inches in length.
From the A/C opening, cut the channel iron to the length of the opening at the sides where the plywood seam is located. Curve the cut ends with a saw or grinder.
Press the two ends of the plywood together so they are even with each other and slide/drive the channel iron over both sections of plywood, making them even with each other. The channel iron should be in between the rubber roof membrane and the plywood at the top side so that the rubber covers the channel iron on top. If there is a decorative payer of ceiling then the same on the underside so that the channel iron only wraps the plywood and not the coverings.
from inside the rig, drive short screws through the channel iron and in to the plywood making sure they do not go all the way through the plywood so that the channel iron does not slip.
This should gusset and strengthen the opening as well as level the section so that the A/C will seal properly in the opening.
Could even use some epoxy on the plywood to help make the repair permanent and more solid.
Then get a NEW A/C seal and put the unit back in the hole after everything (including the epoxy if used is dry.
:E [purple]I ride it like I stole it![/purple] :B
2004 Fun Mover with a 1998 Road King and a 2002 Sportster tucked in the garage, Dragging a 2002 "RAM Tough" Dodge Dakota Crew Cab. Ohhh what a haul!
TSgt(Ret.) USAF
.......and I just may have.......
I'm on "CB-13", are you?
2004 Fun Mover with a 1998 Road King and a 2002 Sportster tucked in the garage, Dragging a 2002 "RAM Tough" Dodge Dakota Crew Cab. Ohhh what a haul!
TSgt(Ret.) USAF
Options
- Mark as New
- Bookmark
- Subscribe
- Mute
- Subscribe to RSS Feed
- Permalink
- Report Inappropriate Content
Oct-20-2014 12:14 PM
Well the first thing is to get it covered and leave the roof open until it all dries out. You want to stop any chance of rot or mold. Waste some propane and run the heater in the trailer so the heat goes out through the AC opening to help dry it out. From your pictures it doesn't look like there is any rot so you hopefully caught it early enough.
If the dealer won't warranty then before spending the money on a complete roof I would find a way to prop it up and level it. here's my first thought.
After it's dry I would get a few buddies together, climb up on the roof pull the AC up out of the hole and set it aside on the roof on a piece of plywood.Then you can see what you're up against and make a plan.
Based on the little information I have I would try to slide a 2x4 up into the opening on either side of the AC. Lay the 2x4 flat side up so it can flex a little. Then have my friend push up hard on the 2x4 from the inside (or rent a drywall stand or something) to level the two pieces of the roof out. Then from up on the roof I would drive some 2 - 2.5 inch screws with washers right through the rubber and down through the plywood and into the 2x4.
Seal the screw heads and washer with a small dab of Dicor sealant. Wait a week for the sealant to get good and dry then follow up the seal with a 2" square piece of Eternabond tape. reinstall the AC and tighten the bolts down until the gasket just starts compressing.
.
2001 Suburban 4x4. 6.0L, 4.10 3/4 ton **** 2005 Jayco Jay Flight 27BH **** 1986 Coleman Columbia Popup
2001 Suburban 4x4. 6.0L, 4.10 3/4 ton **** 2005 Jayco Jay Flight 27BH **** 1986 Coleman Columbia Popup
Options
- Mark as New
- Bookmark
- Subscribe
- Mute
- Subscribe to RSS Feed
- Permalink
- Report Inappropriate Content
Oct-20-2014 11:04 AM
I talked with two dealers this morning. They both suggested that there was no manufacturing defect and that is the way they are built. One suggested that there must be water damage that caused the plywood to warp. I have a hard time believing that because it happened on both sides and visual inspection doesn't show any long-term water damage. Both of the places I talked with said that the roof membrane was going to need to come off to get at it and repair it. One quoted a new roof at $4500.
If I was to buy a whole trailer cover, that would be waterproof and would buy me some time, right? I think the only realistic option is to build my own framework to better support the wood. I am not spending $4500 for a whole new roof.
Steve
If I was to buy a whole trailer cover, that would be waterproof and would buy me some time, right? I think the only realistic option is to build my own framework to better support the wood. I am not spending $4500 for a whole new roof.
Steve
'06 Sequoia
Rockwood 2501SS, 5100 lbs dry, 5700 loaded
Primus Brake Controller
Remanufactured Hensley Cub Hitch
Rockwood 2501SS, 5100 lbs dry, 5700 loaded
Primus Brake Controller
Remanufactured Hensley Cub Hitch
Options
- Mark as New
- Bookmark
- Subscribe
- Mute
- Subscribe to RSS Feed
- Permalink
- Report Inappropriate Content
Oct-20-2014 09:48 AM
westend wrote:
I'd suggest you fill the "square" with material underneath the joint where the roof sheathing meet. I wouldn't use the air conditioner's fastening bolts because those are not typically tightened completely.
+1
I'd try to brace/support the entire opening around the AC unit along with anything else I could access from the 14"x14" opening. If you need to screw anything from the roof side patch with Eternabond tape and replace the AC gasket while you're at it.
2000 KZ Sportsman 2505 (overhauled & upgraded 2014)
2016 Chevy Express 3500 15 passanger van
6 humans, 2 cats, and a dog
Visit our blog at www.ROWLESmade.com
Our trailer re-build thread
2016 Chevy Express 3500 15 passanger van
6 humans, 2 cats, and a dog
Visit our blog at www.ROWLESmade.com
Our trailer re-build thread
Options
- Mark as New
- Bookmark
- Subscribe
- Mute
- Subscribe to RSS Feed
- Permalink
- Report Inappropriate Content
Oct-19-2014 05:38 PM
RoyB wrote:
Usually all you find is the 14-inch by 14-inch hole supported through the entire roof opening. The roof mounted air conditioner top section is sandwiched to the bottom section with only four long bolts and a gasket. If the four long bolts got loose you may have got water damage into the center of the ceiling around the top air conditioner housing...
I know on my POPUP trailer ceiling I have two metal support beams that runs from one side of the roof to the other.
All I see on my fifth wheel trailer is just a wood support frame around the 14-inch by 14-inch hole. In the fifth wheel I have a built-in air duct cut out using the foam sprayed into the ceiling. I have pulled down the ceiling ducts and run RG cables thru theses ducts to get signal from end of the trailer to the other...
Hard to get my directions from your photo...
Roy Ken
This leads me to believe there really should have been some type of support structure there. My 4 bolts are tight. It is sandwiching the gasket to the roof. The problem is the only thing holding the roof is a piece of plywood. The hole that was cut in the plywood went across a seam between sheets of plywood and now there is no cross support to hold the plywood up. The plywood has bent down and the gasket can't make up the gap from one piece of plywood which has held up well to the next that is bending down from the pressure.
Given that I have the identical problem on both sides, it really seems like a design or manufacturing defect.
I'll call my local dealer tomorrow and see what they have to say before I try to come up with my own repair. Thanks for all the help and guidance.
Steve
'06 Sequoia
Rockwood 2501SS, 5100 lbs dry, 5700 loaded
Primus Brake Controller
Remanufactured Hensley Cub Hitch
Rockwood 2501SS, 5100 lbs dry, 5700 loaded
Primus Brake Controller
Remanufactured Hensley Cub Hitch
Options
- Mark as New
- Bookmark
- Subscribe
- Mute
- Subscribe to RSS Feed
- Permalink
- Report Inappropriate Content
Oct-19-2014 03:50 PM
skskarda wrote:westend wrote:
What is that metal box channel in the pictures?
What you are seeing is a close up picture looking from inside the air conditioner. There is some metal framing for the air conditioner which is what you are seeing but it does not fill the whole square so there is room for this to happen.
Your question did give me an idea on a potential fix but it won't be easy. I might be able to make a custom piece of angle iron that I could fast up against the top of the roof using a nuts/washers on the four bolts that hold the air conditioner in place on the roof. It would be challenging but it should be possible.
I think your on the right track. Look for something called flexangle. It is easy to work with, and quite strong. It's not going to be pretty no matter what you do. I guess this would be a good reason to go to the factory of any unit your going to purchase so you can see how they are built and make a determinination on whether you think it will stand the test of time.
Ron & Charlotte
WD8CBT since 1976
32' Gulfstream Ameri-Camp & 05 Ram QC LB
I started with nothing and I still have most of it left
I never fail, I just succeed in finding out what doesn't work
WD8CBT since 1976
32' Gulfstream Ameri-Camp & 05 Ram QC LB
I started with nothing and I still have most of it left
I never fail, I just succeed in finding out what doesn't work
Options
- Mark as New
- Bookmark
- Subscribe
- Mute
- Subscribe to RSS Feed
- Permalink
- Report Inappropriate Content
Oct-19-2014 03:39 PM
Usually all you find is the 14-inch by 14-inch hole supported through the entire roof opening. The roof mounted air conditioner top section is sandwiched to the bottom section with only four long bolts and a gasket. If the four long bolts got loose you may have got water damage into the center of the ceiling around the top air conditioner housing...


I know on my POPUP trailer ceiling I have two metal support beams that runs from one side of the roof to the other.
All I see on my fifth wheel trailer is just a wood support frame around the 14-inch by 14-inch hole. In the fifth wheel I have a built-in air duct cut out using the foam sprayed into the ceiling. I have pulled down the ceiling ducts and run RG cables thru theses ducts to get signal from end of the trailer to the other...
Hard to get my directions from your photo...
Roy Ken
My Posts are IMHO based on my experiences - Words in CAPS does not mean I am shouting
Roy - Carolyn
RETIRED DOAF/DON/DOD/CONTR RADIO TECH (42yrs)
K9PHT (Since 1957) 146.52M
2010 F150, 5.4,3:73 Gears,SCab
2008 Starcraft 14RT EU2000i GEN
2005 Flagstaff 8528RESS
Roy - Carolyn
RETIRED DOAF/DON/DOD/CONTR RADIO TECH (42yrs)
K9PHT (Since 1957) 146.52M
2010 F150, 5.4,3:73 Gears,SCab
2008 Starcraft 14RT EU2000i GEN
2005 Flagstaff 8528RESS
Options
- Mark as New
- Bookmark
- Subscribe
- Mute
- Subscribe to RSS Feed
- Permalink
- Report Inappropriate Content
Oct-19-2014 03:38 PM
I'd suggest you fill the "square" with material underneath the joint where the roof sheathing meet. I wouldn't use the air conditioner's fastening bolts because those are not typically tightened completely.
'03 F-250 4x4 CC
'71 Starcraft Wanderstar -- The Cowboy/Hilton
'71 Starcraft Wanderstar -- The Cowboy/Hilton
Options
- Mark as New
- Bookmark
- Subscribe
- Mute
- Subscribe to RSS Feed
- Permalink
- Report Inappropriate Content
Oct-19-2014 03:28 PM
majorgator wrote:
If I understand your situation correctly, there is/was no support between the two pieces of roof sheathing. Perhaps there was only glue/nails/screws/whatever that held it together.
You believe this is a manufacturing defect, and from what I can tell, you are probably correct. This is referred to as a "concealed condition", one in which you could not have possibly, under normal means, been aware of at the time of purchase. This could refer to both intentional or unintentional events. Typically, there are no warranty terms for this type of condition. In other words, the warranty is effective upon you learning of the condition. There are laws for this in FL, and I perhaps in your location as well. I think you should contact the dealer you purchased the TT from and use the very specific term "concealed condition" and ask them address this problem at no cost. If they do not, then you should contact the BBB and see if they can point you in the right direction.
This is what I do before attempting the total strip down and rebuild. It won't take much time and might work in your favor. At the end of the day, if you run into wall, you'll be money ahead by fixing it yourself vs. pushing the issue.
I really don't want to do a complete roof rebuild. I think I would buy a whole cover to keep the water out while it is in storage and find a temporary fix while using it.
I'll talk to my dealer and see if they might be able to consider this a warranty item. I appreciate the guidance.
'06 Sequoia
Rockwood 2501SS, 5100 lbs dry, 5700 loaded
Primus Brake Controller
Remanufactured Hensley Cub Hitch
Rockwood 2501SS, 5100 lbs dry, 5700 loaded
Primus Brake Controller
Remanufactured Hensley Cub Hitch
Options
- Mark as New
- Bookmark
- Subscribe
- Mute
- Subscribe to RSS Feed
- Permalink
- Report Inappropriate Content
Oct-19-2014 03:26 PM
westend wrote:
What is that metal box channel in the pictures?
What you are seeing is a close up picture looking from inside the air conditioner. There is some metal framing for the air conditioner which is what you are seeing but it does not fill the whole square so there is room for this to happen.
Your question did give me an idea on a potential fix but it won't be easy. I might be able to make a custom piece of angle iron that I could fast up against the top of the roof using a nuts/washers on the four bolts that hold the air conditioner in place on the roof. It would be challenging but it should be possible.
'06 Sequoia
Rockwood 2501SS, 5100 lbs dry, 5700 loaded
Primus Brake Controller
Remanufactured Hensley Cub Hitch
Rockwood 2501SS, 5100 lbs dry, 5700 loaded
Primus Brake Controller
Remanufactured Hensley Cub Hitch


