Turn on suggestions
Auto-suggest helps you quickly narrow down your search results by suggesting possible matches as you type.
Showing results for
- Good Sam Community
- Groups
- Truck Camper Group
- Forum
- Re: Avion truck campers - Hundreds of photos
Options
- Subscribe to RSS Feed
- Mark Topic as New
- Mark Topic as Read
- Float this Topic for Current User
- Bookmark
- Subscribe
- Mute
- Printer Friendly Page
Avion truck campers - Hundreds of photos
Options
- Mark as New
- Bookmark
- Subscribe
- Mute
- Subscribe to RSS Feed
- Permalink
- Report Inappropriate Content
May-11-2011 10:33 AM
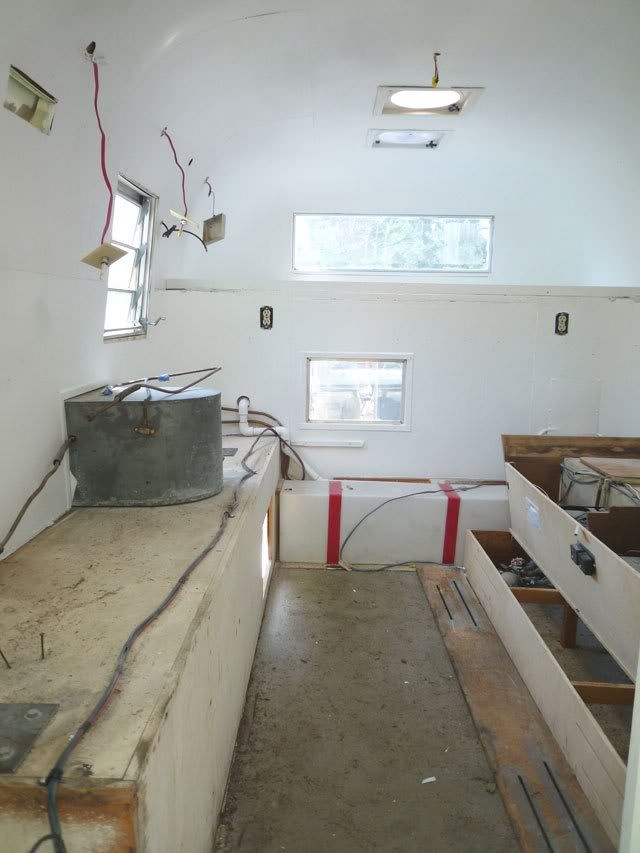
Without going into too much painful detail, we had a mishap several week-ends ago. While working with sand bag crews on the Mississippi River, the truck and camper fell into the flood waters as a road collapsed. Because of a number of issues dealing with the wrecker truck, we had to release the camper as the truck was reeled up over the bank. The good news is that the truck is as good as new after a thorough rinsing, inspection of brakes, etc. The bad news is that the camper was thoroughly drowned. A lot of people had far worse trouble than we did, so we consider ourselves lucky. The floods are ongoing as I write.
Our planned trip to Montana in June is called off. heh.
However, I have now convinced my dear Jane that its time to really update the TC. After drying for several days we pulled out the interior. Amazingly the Zolatone paint that I had applied last year is good as new after a cleaning.
Without burdening the TC family overmuch, I'd like to ask some advice other than don't park too near a flood :-).
My DW was overjoyed that I had a plan for the bathroom: a composting toilet developed by Nature's Head http://www.natureshead.net/. Our holding tank was practically unusable and there was no real grey water tank on the 67 Avion. Our plan is to rip out the bathroom and install one of these and converting the blackwater to a greywater tank. Any experience with this?
Finally, the roof. I admit that I have not really done the work I should have. Now, I need to remove the various sealants on the roof and repair it. We are also setting up for a solar installation. Any advice as to this?

Here's hoping I have posted the pictures correctly. And many thanks in advance for your advice.
Our planned trip to Montana in June is called off. heh.
However, I have now convinced my dear Jane that its time to really update the TC. After drying for several days we pulled out the interior. Amazingly the Zolatone paint that I had applied last year is good as new after a cleaning.
Without burdening the TC family overmuch, I'd like to ask some advice other than don't park too near a flood :-).
My DW was overjoyed that I had a plan for the bathroom: a composting toilet developed by Nature's Head http://www.natureshead.net/. Our holding tank was practically unusable and there was no real grey water tank on the 67 Avion. Our plan is to rip out the bathroom and install one of these and converting the blackwater to a greywater tank. Any experience with this?
Finally, the roof. I admit that I have not really done the work I should have. Now, I need to remove the various sealants on the roof and repair it. We are also setting up for a solar installation. Any advice as to this?
Here's hoping I have posted the pictures correctly. And many thanks in advance for your advice.
Labels:
- Labels:
-
Truck Campers
4,347 REPLIES 4,347
Options
- Mark as New
- Bookmark
- Subscribe
- Mute
- Subscribe to RSS Feed
- Permalink
- Report Inappropriate Content
Nov-29-2014 04:00 PM
D1trout wrote:
There are a few ribs in mine that have strips of the aluminum skin material riveted to them as shims. Clearly, the original builders wanted an even surface along the ribs to avoid deformation of the inner skin once installed.
Dick
Dick , when I did the front end repair on mine I noticed those rib shims . They were on the next to the last rib to where the front plastic attaches . At first I was puzzled . I took one side off and ran a straight edge spanning several ribs and they lined up perfectly , the side with the shim in place missed the last rib by 1/8" . Then it dawned on me that the shims were there to compensate for the thickness of the plastic end cap that goes under the front to back aluminum skin . At least that is my theory . Did you find shims any other place except the next to last rib before an end cap ?
'68 Avion C-11
'02 GMC DRW D/A flatbed
'02 GMC DRW D/A flatbed
Options
- Mark as New
- Bookmark
- Subscribe
- Mute
- Subscribe to RSS Feed
- Permalink
- Report Inappropriate Content
Nov-29-2014 02:49 PM
Dennis, you've made my day with that picture! I just now finished taking out the inner skin. I haven't taken the end caps off yet, but judging by the irregular nature of the foam application in the sides and on the ceiling, the R Max is going to be a great alternative. And thanks for your comment about having the rig level when undertaking the foam installation. I would not have thought about that. The fact that it gets very rigid when the new foam is complete is most encouraging. I will take a bunch of rib depth measurements tomorrow to get an idea about the number of layers of foam. Also glad to know you like contact cement.
A couple of questions:
How did you insulate behind the end caps?
Are you reusing or replacing the inner skin?
Do you foresee any problems with the build-up of wiring between the foam and the skin? There are a few ribs in mine that have strips of the aluminum skin material riveted to them as shims. Clearly, the original builders wanted an even surface along the ribs to avoid deformation of the inner skin once installed.
Another question: does the skin in the Cayo run side to side or lengthwise? My C11 is three long sheets running lengthwise. I've been thinking that for a homebuilder, side to side would be easier to deal with and install neatly...
That's it for now. Again, thanks for the pic!
Dick
Options
- Mark as New
- Bookmark
- Subscribe
- Mute
- Subscribe to RSS Feed
- Permalink
- Report Inappropriate Content
Nov-29-2014 11:45 AM
Dick, Your right that the 1/2" will bend and follow the contours, I used it on mine.........

Unless your camper is constructed differently than mine you do not have a consistent 1 1/2".
I got 2 layers in (1"), the remaining space varied from 1/2", 3/8" and 1/4".
I called it a day at 1" but you could install something like the foil bubble wrap insulation to cap it all off.
I did alot of research on contact cements and settled on good old Wellwood,it has good heat resistance (160-180) and it's waterproof.
If you have not done alot of laminating, you want to use a roller and pan to apply the contact glue.
Make sure the camper is level and square before you start, once the boards are installed and you use the stick foam along the edges the camper gets very rigid.
Any questions feel free to ask.
Dennis
Options
- Mark as New
- Bookmark
- Subscribe
- Mute
- Subscribe to RSS Feed
- Permalink
- Report Inappropriate Content
Nov-29-2014 06:58 AM
Rfuerst911sc, I'm going to experiment with the best method of foam board application when I've gotten the skin and old foam out. I believe 1/2" sheets will glue in easily without back cuts in every part of the shell except the curved end corners. Spray foam in small cans should seve there, and in any gaps. I don't think there would squeaking if everything is well-glued. And perhaps construction adhesive will be a better way of attaching it. Contact cement has the advantage of bonding instantly; bracing the sheets in place while the glue sets wouldn't be necessary.
My concern with using the big spray-in foam tanks is uniformity of application and just general messiness... my experiences with small cans of spray-in foam have convinced me that the product can be a wee bit unpredictable and hard to control...
As I've crawled around on the top of the shell, it's clear that there are numerous places where the foam did not fill the 1 1/2" space between skins. I'm just thinking that if the factory foam guy couldn't get the foam to fill smoothly, I might be challenged too. Foam board seems easy to work with, guarantees a solid, clean gapless layer, and allows the whole process to proceed at a more leisurely rate. Well-glued, I think it will provide the structural rigidity required.
If anyone on this board has used the big foam tank application, I'd like to hear about it.
Onward!
Dick
Options
- Mark as New
- Bookmark
- Subscribe
- Mute
- Subscribe to RSS Feed
- Permalink
- Report Inappropriate Content
Nov-29-2014 06:52 AM
rfuerst911sc wrote:D1trout wrote:
Michael, thanks for your reply. I'll just start drilling rivets and pulling off panels. What could possibly go wrong...
I think your use of bed liner material on the exterior should be an interesting look - sort of a stealth Avion. I've decided to buy a large can of the Kool Seal elastomeric roof coating, put two coats on the roof and at least one coat on the entire inside of the shell before I put the insulation in.
And I am now thinking to glue 1/2" sheets of foil faced R Max polyisocyanurate insulation board (widely available, at HD and most other building supply stores) in three layers into the shell, using contact cement to bond the layers. Then sandwich everything in snugly with the inner skin. That board has the highest R value of anything on the market, even exceeding foamed-in closed cell foam. I reckon to get nearly R10 with that lay-up.
What I've learned crawling around on top and from the panels I have already removed inside is that the foamed-in factory insulation was pretty erratic in its depth and coverage - voids and thin spots in many places. The board glue-up will eliminate that and be a lot easier to apply uniformly, I think. Plus I have to think that the three layers of foil will add some extra pizazz to the final R value. I figure to seal any nooks and crannies with the little cans of spray foam.
i will put 1/16" x 3/4" bedding tape on the inner faces of the ribs before riveting on the inner skin, to address the thermal transfer issue you raised last spring.
Thanks again for your reply. Isn't it interesting how we each find our own solutions to the challenges these old Avions present us with!
Dick
Interesting approach for the insulation do you think there will be any concerns with the ridgid foam squeeking from movement ? Do you think contact cement will hold ? I believe Avion thought that the application of spray foam not only insulated but also helped with structural rigidity. I would think modern closed cell spray foam is superior to what was used in the 60's for insulation and strength but I could be wrong. I'm not sure what direction I will take with mine but your idea is interesting. Will the 1/2 " ridgid foam curve without having to make back cuts ?
I think Avion thought long and hard about what to use. I wonder how much better modern spray foam is, over what they used in the 1960s. I imagine that there are different types of foam, and getting the right one is important. Look at how long the factory foam has lasted.
Ford F-350 4x4 Diesel
1988 Avion Triple Axle Trailer
1969 Avion C-11 Camper
1988 Avion Triple Axle Trailer
1969 Avion C-11 Camper
Options
- Mark as New
- Bookmark
- Subscribe
- Mute
- Subscribe to RSS Feed
- Permalink
- Report Inappropriate Content
Nov-29-2014 04:50 AM
D1trout wrote:
Michael, thanks for your reply. I'll just start drilling rivets and pulling off panels. What could possibly go wrong...
I think your use of bed liner material on the exterior should be an interesting look - sort of a stealth Avion. I've decided to buy a large can of the Kool Seal elastomeric roof coating, put two coats on the roof and at least one coat on the entire inside of the shell before I put the insulation in.
And I am now thinking to glue 1/2" sheets of foil faced R Max polyisocyanurate insulation board (widely available, at HD and most other building supply stores) in three layers into the shell, using contact cement to bond the layers. Then sandwich everything in snugly with the inner skin. That board has the highest R value of anything on the market, even exceeding foamed-in closed cell foam. I reckon to get nearly R10 with that lay-up.
What I've learned crawling around on top and from the panels I have already removed inside is that the foamed-in factory insulation was pretty erratic in its depth and coverage - voids and thin spots in many places. The board glue-up will eliminate that and be a lot easier to apply uniformly, I think. Plus I have to think that the three layers of foil will add some extra pizazz to the final R value. I figure to seal any nooks and crannies with the little cans of spray foam.
i will put 1/16" x 3/4" bedding tape on the inner faces of the ribs before riveting on the inner skin, to address the thermal transfer issue you raised last spring.
Thanks again for your reply. Isn't it interesting how we each find our own solutions to the challenges these old Avions present us with!
Dick
Interesting approach for the insulation do you think there will be any concerns with the ridgid foam squeeking from movement ? Do you think contact cement will hold ? I believe Avion thought that the application of spray foam not only insulated but also helped with structural rigidity. I would think modern closed cell spray foam is superior to what was used in the 60's for insulation and strength but I could be wrong. I'm not sure what direction I will take with mine but your idea is interesting. Will the 1/2 " ridgid foam curve without having to make back cuts ?
Options
- Mark as New
- Bookmark
- Subscribe
- Mute
- Subscribe to RSS Feed
- Permalink
- Report Inappropriate Content
Nov-28-2014 05:29 PM
He listed it on ebay, then pulled the ad less than a day later. I haven't heard from his since.
Ford F-350 4x4 Diesel
1988 Avion Triple Axle Trailer
1969 Avion C-11 Camper
1988 Avion Triple Axle Trailer
1969 Avion C-11 Camper
Options
- Mark as New
- Bookmark
- Subscribe
- Mute
- Subscribe to RSS Feed
- Permalink
- Report Inappropriate Content
Nov-28-2014 04:26 PM
69. Wasn't it Chris who sold his rig rather suddenly last winter on eBay? He who had the Wordpress site detailing his excellent restoration job...
Options
- Mark as New
- Bookmark
- Subscribe
- Mute
- Subscribe to RSS Feed
- Permalink
- Report Inappropriate Content
Nov-28-2014 03:35 PM
Has anyone heard from Avion C-11, Chris. He was doing an awesome job.
Ford F-350 4x4 Diesel
1988 Avion Triple Axle Trailer
1969 Avion C-11 Camper
1988 Avion Triple Axle Trailer
1969 Avion C-11 Camper
Options
- Mark as New
- Bookmark
- Subscribe
- Mute
- Subscribe to RSS Feed
- Permalink
- Report Inappropriate Content
Nov-28-2014 03:25 PM
cajunavion wrote:
Howdy!
Happy belated turkeyday!
Tiki I really like your flatbed rig, lots of storage.
What are those poles between the cab and camper
for?
It's part of the headboard of the flatbed ( headache rack ).
'68 Avion C-11
'02 GMC DRW D/A flatbed
'02 GMC DRW D/A flatbed
Options
- Mark as New
- Bookmark
- Subscribe
- Mute
- Subscribe to RSS Feed
- Permalink
- Report Inappropriate Content
Nov-28-2014 08:14 AM
Michael, thanks for your reply. I'll just start drilling rivets and pulling off panels. What could possibly go wrong...
I think your use of bed liner material on the exterior should be an interesting look - sort of a stealth Avion. I've decided to buy a large can of the Kool Seal elastomeric roof coating, put two coats on the roof and at least one coat on the entire inside of the shell before I put the insulation in.
And I am now thinking to glue 1/2" sheets of foil faced R Max polyisocyanurate insulation board (widely available, at HD and most other building supply stores) in three layers into the shell, using contact cement to bond the layers. Then sandwich everything in snugly with the inner skin. That board has the highest R value of anything on the market, even exceeding foamed-in closed cell foam. I reckon to get nearly R10 with that lay-up.
What I've learned crawling around on top and from the panels I have already removed inside is that the foamed-in factory insulation was pretty erratic in its depth and coverage - voids and thin spots in many places. The board glue-up will eliminate that and be a lot easier to apply uniformly, I think. Plus I have to think that the three layers of foil will add some extra pizazz to the final R value. I figure to seal any nooks and crannies with the little cans of spray foam.
i will put 1/16" x 3/4" bedding tape on the inner faces of the ribs before riveting on the inner skin, to address the thermal transfer issue you raised last spring.
Thanks again for your reply. Isn't it interesting how we each find our own solutions to the challenges these old Avions present us with!
Dick
Options
- Mark as New
- Bookmark
- Subscribe
- Mute
- Subscribe to RSS Feed
- Permalink
- Report Inappropriate Content
Nov-28-2014 07:43 AM
Howdy!
Happy belated turkeyday!
Tiki I really like your flatbed rig, lots of storage.
What are those poles between the cab and camper
for?
I meet someone last night who claimed my rig
was in San Antonio last week. I apologized
it was not me. Could that be you 69?
These Avions really make people excited,
I wish I had stock in the Avion Corp. Well
on second thought! Back to the water heater.
Its test time.
Options
- Mark as New
- Bookmark
- Subscribe
- Mute
- Subscribe to RSS Feed
- Permalink
- Report Inappropriate Content
Nov-27-2014 04:56 AM
D1trout wrote:
Michael111, tomorrow I will begin drilling out the rivets and removing the inner vinyl-coated skin and old foam in my C11. I'm wondering if you have replaced the foam and the inner skin on your rig yet? And resolved the Luan/ rib insulation idea you proposed. I'd like to learn what you've learned...
Dick
Dick
No i have not gotten to it
i am was just to swamped work wise to put much attention to the C11
but i just ordered all the electric replacement parts ( stop , turn , marker etc.) and hopefully after thanksgiving week once everything is delivered i can start wiring everything from scratch
i am going to give it a try with my original idea of sticking to a total build cost including the C11 of about $ 6000 with a open floor space as much as possible , so compromises will have to be made.
Most of the $$ will go into the solar and fridge
my insulation will be coated bubble wrap
inside will be a combination of aluminum taken from the original , white illuminated acrylic panels and luan
i made the decision of painting the outside with truck bed liner , yes this will make some of you cringe :E but its going to be watertight
Solar system is picked out
it will be prewired for a wind turbine
outside lights are ordered
still on the fence if i want to have water in the camper , i have heard great things about composting toilets not sure yet
most of the furniture is roughed in
fridge is picked out
the basement will be reconfigured and to house a pull out kitchen
by the next winter i will probably install a catalytic heater and the LP gas will be integrated
into the truck bed , i am thinking that if water, then the tanks will go into the truck bed as well.
Happy Thanksgiving everyone
Options
- Mark as New
- Bookmark
- Subscribe
- Mute
- Subscribe to RSS Feed
- Permalink
- Report Inappropriate Content
Nov-27-2014 04:24 AM
And ticki2, I am sure there are good sources throughout the country but I found the used parts service (phone, email, shipping) of the woman who works at "5 Star RV" in Denver to be of excellence! Google them and ask for used parts. The women (I have her name somewhere if you need it) is really down to earth and very helpful. It seems their prices are reasonable too.
Options
- Mark as New
- Bookmark
- Subscribe
- Mute
- Subscribe to RSS Feed
- Permalink
- Report Inappropriate Content
Nov-26-2014 07:22 PM
Thanks for that input , guess I'll keep searching for a solution .
'68 Avion C-11
'02 GMC DRW D/A flatbed
'02 GMC DRW D/A flatbed


