- Good Sam Community
- Groups
- Truck Camper Group
- Forum
- Re: Avion truck campers - Hundreds of photos
- Subscribe to RSS Feed
- Mark Topic as New
- Mark Topic as Read
- Float this Topic for Current User
- Bookmark
- Subscribe
- Mute
- Printer Friendly Page
Avion truck campers - Hundreds of photos
- Mark as New
- Bookmark
- Subscribe
- Mute
- Subscribe to RSS Feed
- Permalink
- Report Inappropriate Content
May-11-2011 10:33 AM
Our planned trip to Montana in June is called off. heh.
However, I have now convinced my dear Jane that its time to really update the TC. After drying for several days we pulled out the interior. Amazingly the Zolatone paint that I had applied last year is good as new after a cleaning.

Without burdening the TC family overmuch, I'd like to ask some advice other than don't park too near a flood :-).
My DW was overjoyed that I had a plan for the bathroom: a composting toilet developed by Nature's Head http://www.natureshead.net/. Our holding tank was practically unusable and there was no real grey water tank on the 67 Avion. Our plan is to rip out the bathroom and install one of these and converting the blackwater to a greywater tank. Any experience with this?
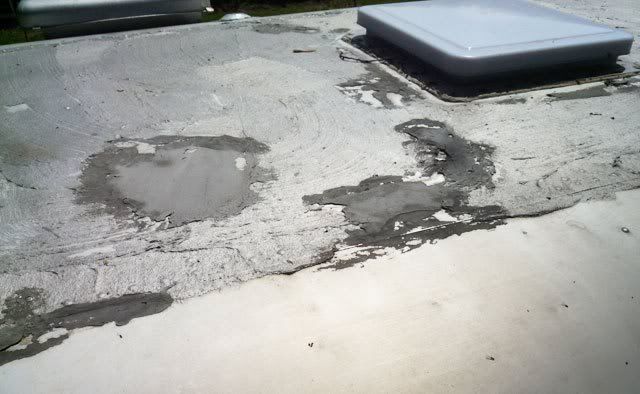
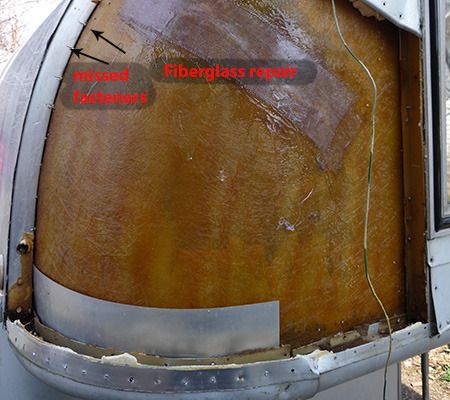
Finally, the roof. I admit that I have not really done the work I should have. Now, I need to remove the various sealants on the roof and repair it. We are also setting up for a solar installation. Any advice as to this?

Here's hoping I have posted the pictures correctly. And many thanks in advance for your advice.
- Labels:
-
Truck Campers
- Mark as New
- Bookmark
- Subscribe
- Mute
- Subscribe to RSS Feed
- Permalink
- Report Inappropriate Content
Nov-30-2015 04:55 AM
It's a long and bumpy road with lots of potholes and detours along the way, but I'm told by reliable sources that the view from Muley Point makes it all worthwhile.
Onward!
Dick
- Mark as New
- Bookmark
- Subscribe
- Mute
- Subscribe to RSS Feed
- Permalink
- Report Inappropriate Content
Nov-30-2015 04:41 AM
'02 GMC DRW D/A flatbed
- Mark as New
- Bookmark
- Subscribe
- Mute
- Subscribe to RSS Feed
- Permalink
- Report Inappropriate Content
Nov-30-2015 02:47 AM
I am the proud new owner of a 1968 C11 purchased last month. With ALL the wood rotted, just loading The 'Silver Pompadour' on to my truck was a bit hairy. I have spent the last month absorbing the massive amount of information on this forum while replacing the rotted wood. What an invaluable resource you have compiled here. Thank you all.
I have taken hundreds of pictures of the process and will post some once it is too cold outside for Marine epoxy and wood glue to setup. That should be soon here in NE PA
1993 Dodge D250 LE Cummins
- Mark as New
- Bookmark
- Subscribe
- Mute
- Subscribe to RSS Feed
- Permalink
- Report Inappropriate Content
Nov-26-2015 02:23 PM
Thanksgiving!
- Mark as New
- Bookmark
- Subscribe
- Mute
- Subscribe to RSS Feed
- Permalink
- Report Inappropriate Content
Nov-06-2015 07:00 PM
Airstream had drains at the bottom of their trailers, even had a special fitting. I don't know if they still do this.
I'd attempt to waterproof any plywood I could get to and seal the seams and fasteners as completely as possible and hope for the best...
- Mark as New
- Bookmark
- Subscribe
- Mute
- Subscribe to RSS Feed
- Permalink
- Report Inappropriate Content
Nov-06-2015 03:25 AM
D1trout wrote:
Rastaman, I don't like the idea of simply smearing Trempro over the holes. Check out large flange rivets from Vintage Trailer Supply. They provide a lot of surface to smear Trempro on before setting them into the hole. Bigger holes warrant a patch of some sort. Or replacing an entire panel that has lots of holes or corrosion damage. Of course, that brings its own set of challenges...
The camper will have enough opportunities for leaks at seams and rivets to make it imperative that you seal all other holes as completely as possible.
Onward!
That is why I thought having a couple of drain hole wouldn't hurt 🙂
- Mark as New
- Bookmark
- Subscribe
- Mute
- Subscribe to RSS Feed
- Permalink
- Report Inappropriate Content
Nov-05-2015 06:09 PM
The camper will have enough opportunities for leaks at seams and rivets to make it imperative that you seal all other holes as completely as possible.
Onward!
- Mark as New
- Bookmark
- Subscribe
- Mute
- Subscribe to RSS Feed
- Permalink
- Report Inappropriate Content
Nov-05-2015 01:56 PM
'02 GMC DRW D/A flatbed
- Mark as New
- Bookmark
- Subscribe
- Mute
- Subscribe to RSS Feed
- Permalink
- Report Inappropriate Content
Nov-05-2015 10:49 AM
- Mark as New
- Bookmark
- Subscribe
- Mute
- Subscribe to RSS Feed
- Permalink
- Report Inappropriate Content
Nov-05-2015 07:04 AM
I am getting all my wood for the bunk area and wings ready to be permanently installed.
The bottom aluminium sheeting, especially in the wing area has many screw holes form PO attempts to fix things. What is recommended
1, Try and seal up all these holes maybe caulking or aluminium duct tape (from inside)?
2, leave some of theses holes open for the wood to 'breath' and maybe act as 'weep' holes for drainage?
- Mark as New
- Bookmark
- Subscribe
- Mute
- Subscribe to RSS Feed
- Permalink
- Report Inappropriate Content
Nov-03-2015 11:45 AM
- Mark as New
- Bookmark
- Subscribe
- Mute
- Subscribe to RSS Feed
- Permalink
- Report Inappropriate Content
Nov-03-2015 07:01 AM

- Mark as New
- Bookmark
- Subscribe
- Mute
- Subscribe to RSS Feed
- Permalink
- Report Inappropriate Content
Nov-03-2015 05:38 AM
'02 GMC DRW D/A flatbed
- Mark as New
- Bookmark
- Subscribe
- Mute
- Subscribe to RSS Feed
- Permalink
- Report Inappropriate Content
Nov-03-2015 04:38 AM
- Mark as New
- Bookmark
- Subscribe
- Mute
- Subscribe to RSS Feed
- Permalink
- Report Inappropriate Content
Nov-03-2015 03:17 AM
ticki2 wrote:
Sounds like you are making good progress . As long as the total thickness of the bunk floor is the same it should work fine . Since I didn't have to replace mine I don't know how the bunk floor was attached to the frame . I suspect it was screwed up from the bottom into the aluminum perimeter U channel , or perhaps down through the channel into the wood . I am not clear on the extra wood you want to add between the ribs . All my windows are framed with aluminum U channel so again not sure why you are adding 2"x2" alum angle under the front window . Some pictures would help clarify .
Ticki2...hope to get some pics soon....they screwed down through the U channel into the wood (Same with the wings)They also used 2" L brackets at the ribs screwed into the rib/U channel into the wood.
Because of the deteriorated condition of the L brackets and U channel areas. I am thinking that strips of wood fitted into the U channel, screwed through,into the wood will provide more support.(instead of using fender washers)
The idea of the angle is that it will span the area under the window, rib to rib (at the bottom of the frame) It will be screwed into the ribs on either side of the window, then screwed into the floor. Providing support in the front center of the bunk, directly to the ribs.
yeh I know a pic is worth a thousand words....


