Turn on suggestions
Auto-suggest helps you quickly narrow down your search results by suggesting possible matches as you type.
Showing results for
- Good Sam Community
- Everything RV
- DIY Maintenance
- Re: corner rot repair
Options
- Subscribe to RSS Feed
- Mark Topic as New
- Mark Topic as Read
- Float this Topic for Current User
- Bookmark
- Subscribe
- Mute
- Printer Friendly Page
corner rot repair
Options
- Mark as New
- Bookmark
- Subscribe
- Mute
- Subscribe to RSS Feed
- Permalink
- Report Inappropriate Content
Oct-14-2015 06:22 PM
I'm neck deep in corner rot repair and wanted to share some pictures and ask a few questions.
I just want to make sure I'm not missing anything. Here are the questions.
1. when cutting out the rot, is it necessary to cut back beyond the discolored wood even if it solid wood and not flaky? If it's ok, do I need to treat the wood with anything?
2. once reframed, the trim strip has to be reattached. I read on here that I should run two strips of butyl tape down each pc of trim before screwing trim back onto corners. Is this the norm?
3. any suggestions on the asthetics of fixing those ceiling corners. I'm doing both corners of camper. lots of rot in both corners.
As you can see, the original beam that the trim pc screws to had crumbled so I tore it out. Even this secondary beam is a bit rotted on the face so I decided to replace it too.
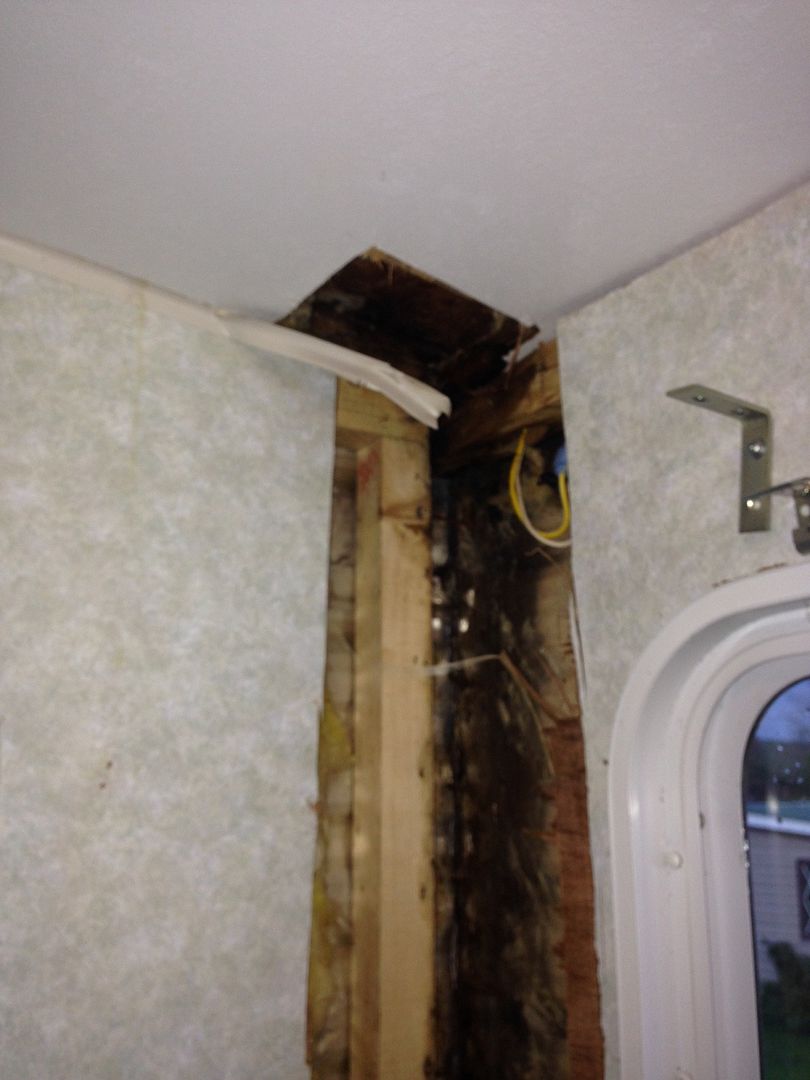
replaced secondary beam. now ready to put the other beam in place to screw corner molding back in.

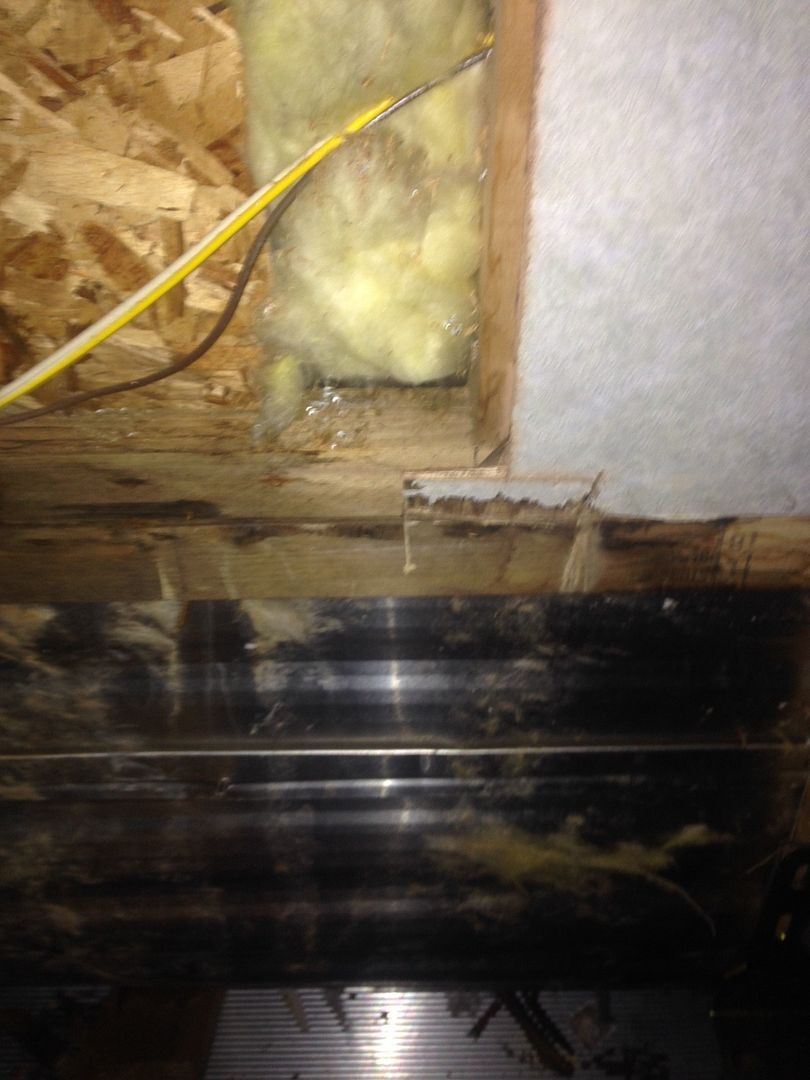
not the greatest pic but this is a view of the wood that still hard as rock just a little discolored on surface from a little moisture. should it stay or should it go now?
I just want to make sure I'm not missing anything. Here are the questions.
1. when cutting out the rot, is it necessary to cut back beyond the discolored wood even if it solid wood and not flaky? If it's ok, do I need to treat the wood with anything?
2. once reframed, the trim strip has to be reattached. I read on here that I should run two strips of butyl tape down each pc of trim before screwing trim back onto corners. Is this the norm?
3. any suggestions on the asthetics of fixing those ceiling corners. I'm doing both corners of camper. lots of rot in both corners.
As you can see, the original beam that the trim pc screws to had crumbled so I tore it out. Even this secondary beam is a bit rotted on the face so I decided to replace it too.
replaced secondary beam. now ready to put the other beam in place to screw corner molding back in.
not the greatest pic but this is a view of the wood that still hard as rock just a little discolored on surface from a little moisture. should it stay or should it go now?
Moderator edit to re-size pictures to forum recommended limit of 640px maximum width.
2007.5 6.7 liter, Suncoast M3GA-68-5 Comp, mega cab,1 ton, srw, 4x4, Factory EB,3.73s
mods-EGR Delete (brand unknown), DPF delete, CCV-delete, FS-2500 bypass filter, H&S Black Maxx Tuner
2003 keystone cougar 281 EFS-31ft
mods-EGR Delete (brand unknown), DPF delete, CCV-delete, FS-2500 bypass filter, H&S Black Maxx Tuner
2003 keystone cougar 281 EFS-31ft
3 REPLIES 3
Options
- Mark as New
- Bookmark
- Subscribe
- Mute
- Subscribe to RSS Feed
- Permalink
- Report Inappropriate Content
Oct-16-2015 10:40 AM
Thanks guys. Slowly making progress!
2007.5 6.7 liter, Suncoast M3GA-68-5 Comp, mega cab,1 ton, srw, 4x4, Factory EB,3.73s
mods-EGR Delete (brand unknown), DPF delete, CCV-delete, FS-2500 bypass filter, H&S Black Maxx Tuner
2003 keystone cougar 281 EFS-31ft
mods-EGR Delete (brand unknown), DPF delete, CCV-delete, FS-2500 bypass filter, H&S Black Maxx Tuner
2003 keystone cougar 281 EFS-31ft
Options
- Mark as New
- Bookmark
- Subscribe
- Mute
- Subscribe to RSS Feed
- Permalink
- Report Inappropriate Content
Oct-16-2015 09:52 AM
1. I would cut back beyond the discoloration a little. I did this on our just to be safe as I considered that water damaged. WI had to tear out much more out, so it wasn't a big deal for me.
2. It depends on your siding. We have aluminum siding, so I needed enough butyl tape to fill the gaps in the siding. I actually put extra in the low spots and then put a strip on each side of the trim. What I was looking for is compressed butyl tape to push from the seam all the way down. I do the same thing when resealing windows.
3. Hang a picture??? When I cut the ceiling out in ours I tried to piece it together in hard to see areas. We have metal rails that run along the ceiling which made it easy and only have 2 12" seams showing. I used luan and the thickness was a little off from the original paneling, so I needed to sand the edge to get it to look OK. I'd fit it as best you can and then prime and paint the whole ceiling with a thick nap roller to hide it. Killz did a good job sealing over the wallpaper/paneling in our trailer and we painted the ceiling and walls.
woodtrucker wrote:
1. when cutting out the rot, is it necessary to cut back beyond the discolored wood even if it solid wood and not flaky? If it's ok, do I need to treat the wood with anything?
2. once reframed, the trim strip has to be reattached. I read on here that I should run two strips of butyl tape down each pc of trim before screwing trim back onto corners. Is this the norm?
3. any suggestions on the asthetics of fixing those ceiling corners. I'm doing both corners of camper. lots of rot in both corners.
2000 KZ Sportsman 2505 (overhauled & upgraded 2014)
2016 Chevy Express 3500 15 passanger van
6 humans, 2 cats, and a dog
Visit our blog at www.ROWLESmade.com
Our trailer re-build thread
2016 Chevy Express 3500 15 passanger van
6 humans, 2 cats, and a dog
Visit our blog at www.ROWLESmade.com
Our trailer re-build thread
Options
- Mark as New
- Bookmark
- Subscribe
- Mute
- Subscribe to RSS Feed
- Permalink
- Report Inappropriate Content
Oct-15-2015 09:41 AM
I just finished taking apart one slide due to some rot and replacing the floor and some of the vertical structure. this entailed taking off most of the exterior aluminum skin and much of the interior walls. Because of the way these trailers are manufactured much of this is layered. And it can be a real hassle to take apart and keep in good shape. I tore out the complete floor and replaced it (one corner and the front (outside edge) was rotted due to the plastic wrap holding in moisture.
In my case the rot was all "DRY" and was from an old leak while owned by the previous owner. They had stopped the leak but had done nothing to remove what must have been Wet wood at that point.
I cut back the wood where it was rotted well into the good hard non affected wood. I did not treat it as there is no reason to. I added new structure from wood that was used to make a bunk bed in the trailer which I was removing anyway. This made matching the wood size easy. If the wood in yours is still wet I would cut away the rotted parts and let it dry out before I made any repairs.
For the trim strips I cleaned off the old Butyl tape and replaced with new (1 strip) I trimmed off the excess after tightening the screws. But I also ran a bead of caulk around the edge of the trim strip.
I countersunk all the screw heads and caulked over them so water would not migrate along the thread. (This was on the screws mostly on the underside of the floor and the outside where they are exposed to the atmosphere.
Taking off the outside skin is relatively easy but a big job none the less. And I recommend that you take apart as much or a bit more than is necessary. Most of these trailers/RVs are simple construction and if you are handy you can take them apart and put them back together again with no problems and looking like new.
From your photos it looks like you cut the inside wall. This will be hard to replace and you will probably have to do a whole new wall. I took mine apart, and reused it. I Doubt you will be able to buy matching material for the wall.
I also replaced the insulation in that area.
I have some photos of much of what I did if you are interested.
My whole slide reconstruction took me ten days and about $600 in parts. This included a piece of Marine Grade 1 1/8 inch thick plywood for the floor. It also includes some new tools, like a good electric staple gun.
Good Luck.


