Turn on suggestions
Auto-suggest helps you quickly narrow down your search results by suggesting possible matches as you type.
Showing results for
- Good Sam Community
- Groups
- Travel Trailer Group
- Forum
- Re: '71 Starcraft Wanderstar- "The Hilton"
Options
- Subscribe to RSS Feed
- Mark Topic as New
- Mark Topic as Read
- Float this Topic for Current User
- Bookmark
- Subscribe
- Mute
- Printer Friendly Page
'71 Starcraft Wanderstar- "The Hilton"
Options
- Mark as New
- Bookmark
- Subscribe
- Mute
- Subscribe to RSS Feed
- Permalink
- Report Inappropriate Content
Jan-09-2012 07:10 PM
Thought I should post this up because the "Search" feature doesn't return any results and there might be some useful info for older Starcraft owners or those that are mad enough to embark on a complete restoration.
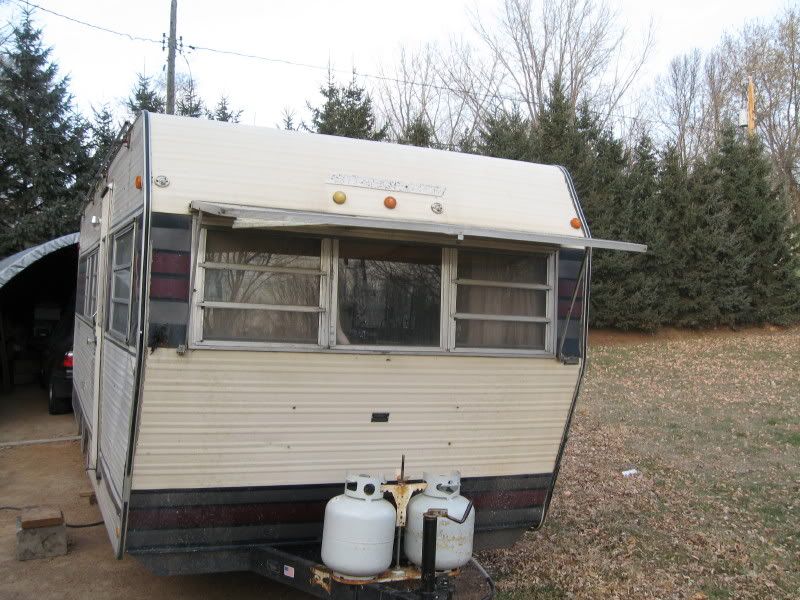
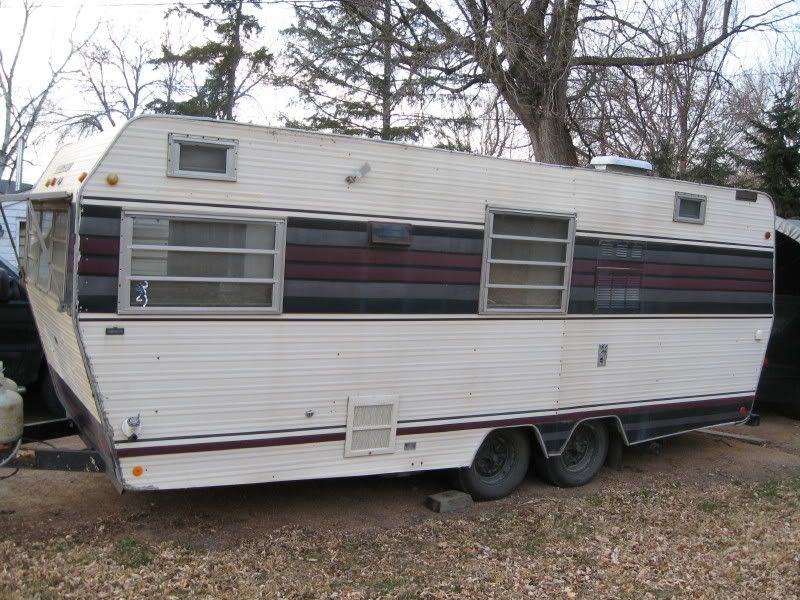
I purchased this 1971 Starcraft-Wanderstar from a local chap with a special purpose in mind: Gutting out the interior to insulate and make comfrotable for working stiffs like myself and, in particular, for those doing work-camping in the upper Midwest. My criteria was: a name brand with solid fame construction, a body that could be worked with (no accident damage, and good running gear (wheels, tires, bearings, and hitch, etc.) I also focused my purchase towards a TT from 19'->26'. I have a Ford F-250 4x4, CC with trailer and tow package. Pictures of "The Hilton" (named and painted by a previous owner) as bought:

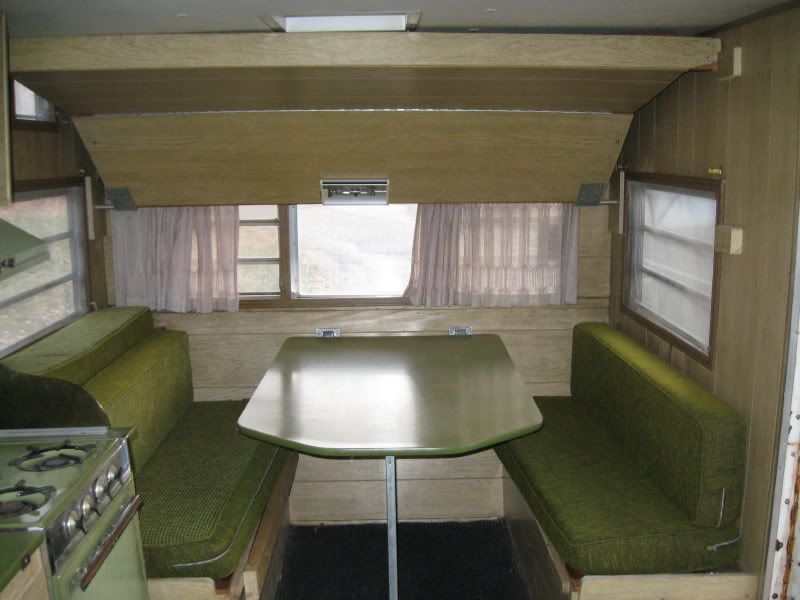
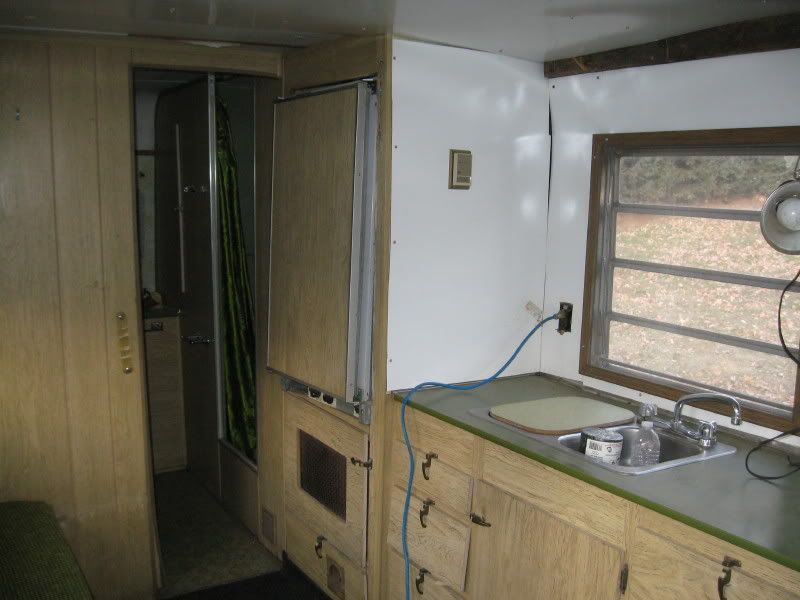
I am currently still working on the Hilton and have about three weeks into it, so far. I am keeping a pictorial work log and will share most of it if others are interested. I have totally gutted the inside and am discarding most of the mechanicals, along with replacing and eliminating windows, repairing water-damaged framing (all of the wall top plates and half of the studs), relocating most of the plumbing, replacing all of the wiring, and installing a completely different decorative style.
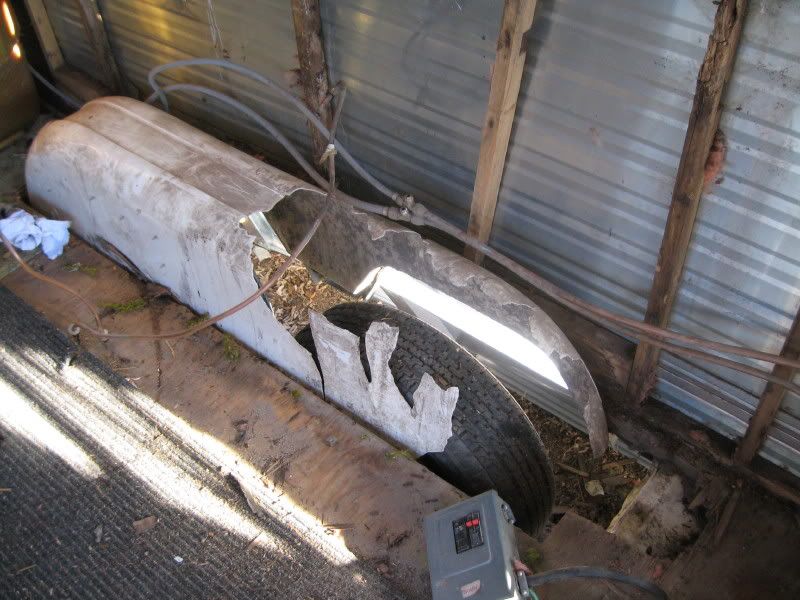
To give an idea of what I found after gutting out the inside, here is a picture of the driver's side and the wheel well:
Here is that same area after reconstruction, the new wheel well frame is skinned with 16 ga. steel sheet, inside, and sprayed with truck bed liner. The frame is insulated and there is a thermal break between any out side joining surfaces and the inside sheeting.

Two of the most cantankerous aspects have been the replacement of the top wall plates and aluminum trim rail and removal of the floor to insulate. The major obstacle to the first is the amount of various goop that was used by previous owners to stop water intrusion. That, and the thousands of clutch drive screws and staples that were removed. The basic carpentry was simple, I replaced the rotten wood with pressure treated fir and, after a day with a grinder fitted with a steel wire wheel to clean the trim rail, the surfaces were all sealed, stapled, and screwed back together.
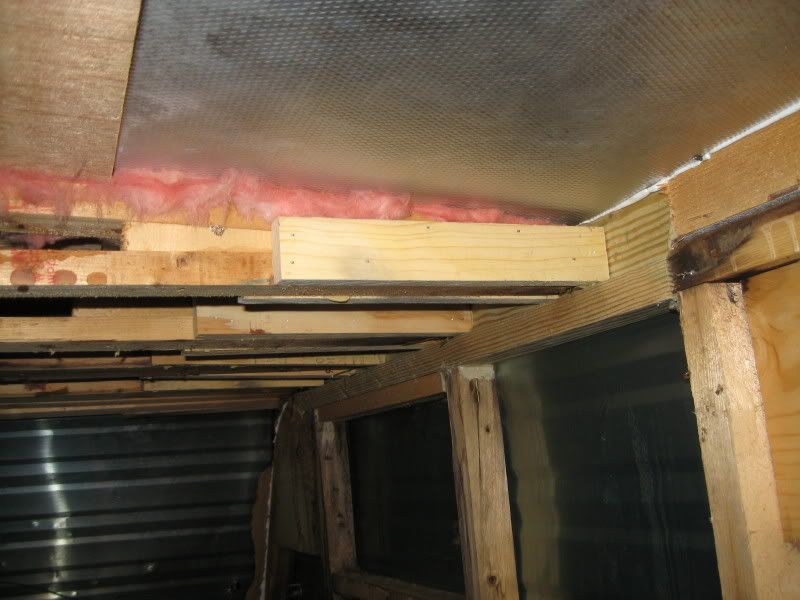
This picture shows the new top plates and the rafter reinforcement I thought was necessary:
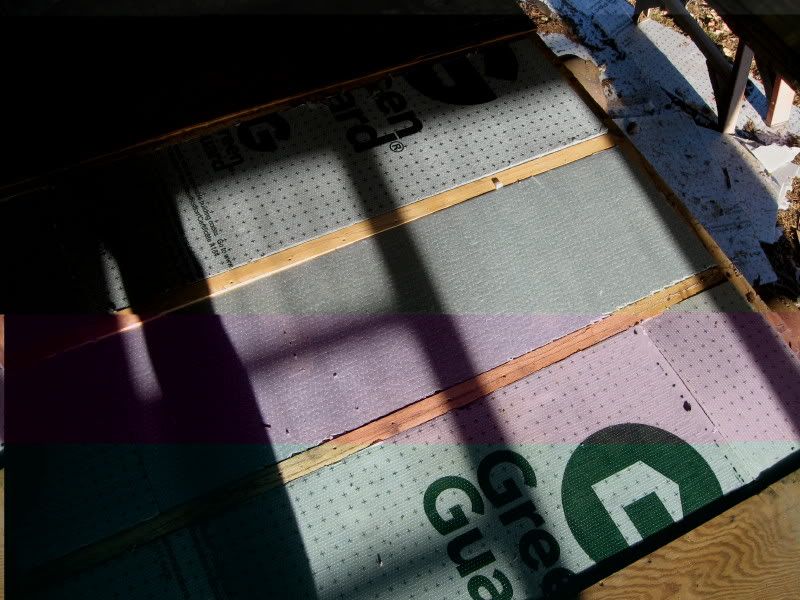
While diving into the wheel well repair I noticed the floor had deteriorated under the water heater. Closer examination showed that the 1 1/2" space underneath the floor was uninsulated, excepting the 1/2" Buildrite on top of the aluminum belly skin. I pulled all of the plywood and installed 1 1/2" of extruded polystyrene in that space:
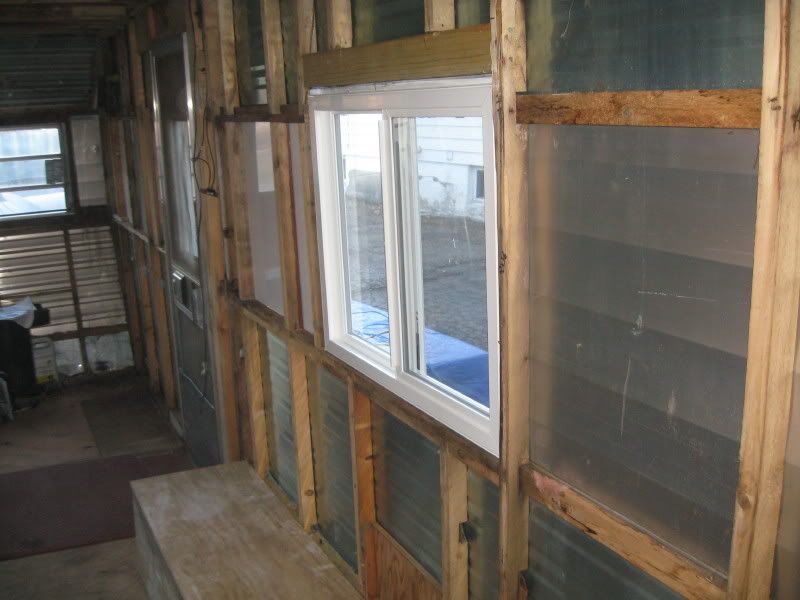
I've replaced two of the three windows I planned on and have removed two, all together. Those vacated jalousie windows are framed and will become insulated wall.
Tomorrow, I'll be replacing the 72" front window and will then move on to the wiring. The existing Precision Dynamics converter tested to be OK and has a solid state battery charger so I will use that for the DC. I am upgrading the older 30 amp service to 50 amp. If there's interest, I can post some more pictures up of the restoration, as I progress, and am always open to any ideas from others.
FWIW, I am going with a Western motif for the interior and have already renamed my baby, "The Cowboy/Hilton".
Edit: Pictures in this thread are unviewable because of Photobucket's recent change in Terms of Service. I plan to migrate to a different hosting site and to repair the images. Please, be patient, as there are many images in this thread.
Edit: Anyone wanting to view images can download this browser extension:Browser extension. It makes all the images in this thread viewable.
I purchased this 1971 Starcraft-Wanderstar from a local chap with a special purpose in mind: Gutting out the interior to insulate and make comfrotable for working stiffs like myself and, in particular, for those doing work-camping in the upper Midwest. My criteria was: a name brand with solid fame construction, a body that could be worked with (no accident damage, and good running gear (wheels, tires, bearings, and hitch, etc.) I also focused my purchase towards a TT from 19'->26'. I have a Ford F-250 4x4, CC with trailer and tow package. Pictures of "The Hilton" (named and painted by a previous owner) as bought:
I am currently still working on the Hilton and have about three weeks into it, so far. I am keeping a pictorial work log and will share most of it if others are interested. I have totally gutted the inside and am discarding most of the mechanicals, along with replacing and eliminating windows, repairing water-damaged framing (all of the wall top plates and half of the studs), relocating most of the plumbing, replacing all of the wiring, and installing a completely different decorative style.
To give an idea of what I found after gutting out the inside, here is a picture of the driver's side and the wheel well:
Here is that same area after reconstruction, the new wheel well frame is skinned with 16 ga. steel sheet, inside, and sprayed with truck bed liner. The frame is insulated and there is a thermal break between any out side joining surfaces and the inside sheeting.
Two of the most cantankerous aspects have been the replacement of the top wall plates and aluminum trim rail and removal of the floor to insulate. The major obstacle to the first is the amount of various goop that was used by previous owners to stop water intrusion. That, and the thousands of clutch drive screws and staples that were removed. The basic carpentry was simple, I replaced the rotten wood with pressure treated fir and, after a day with a grinder fitted with a steel wire wheel to clean the trim rail, the surfaces were all sealed, stapled, and screwed back together.
This picture shows the new top plates and the rafter reinforcement I thought was necessary:
While diving into the wheel well repair I noticed the floor had deteriorated under the water heater. Closer examination showed that the 1 1/2" space underneath the floor was uninsulated, excepting the 1/2" Buildrite on top of the aluminum belly skin. I pulled all of the plywood and installed 1 1/2" of extruded polystyrene in that space:
I've replaced two of the three windows I planned on and have removed two, all together. Those vacated jalousie windows are framed and will become insulated wall.
Tomorrow, I'll be replacing the 72" front window and will then move on to the wiring. The existing Precision Dynamics converter tested to be OK and has a solid state battery charger so I will use that for the DC. I am upgrading the older 30 amp service to 50 amp. If there's interest, I can post some more pictures up of the restoration, as I progress, and am always open to any ideas from others.
FWIW, I am going with a Western motif for the interior and have already renamed my baby, "The Cowboy/Hilton".
Edit: Pictures in this thread are unviewable because of Photobucket's recent change in Terms of Service. I plan to migrate to a different hosting site and to repair the images. Please, be patient, as there are many images in this thread.
Edit: Anyone wanting to view images can download this browser extension:Browser extension. It makes all the images in this thread viewable.
'03 F-250 4x4 CC
'71 Starcraft Wanderstar -- The Cowboy/Hilton
'71 Starcraft Wanderstar -- The Cowboy/Hilton
391 REPLIES 391
Options
- Mark as New
- Bookmark
- Subscribe
- Mute
- Subscribe to RSS Feed
- Permalink
- Report Inappropriate Content
Mar-30-2013 03:01 PM
Sir! You are truly a Master!!!
I saw (and commented on) your other post on the success of firing-up your solar system, and clicked on your link to see what you are up to.... This thread is AMAZING! Picking-up an old "shell" and making it a custom, usable travel trailer is a project that I've often thought about as a retirement project to keep out of the DW's hair....
Absolutely amazing! I'm in awe!!!!
Fire Instructor
2022 Coachmen Leprechaun 319MB
2022 Coachmen Leprechaun 319MB
Options
- Mark as New
- Bookmark
- Subscribe
- Mute
- Subscribe to RSS Feed
- Permalink
- Report Inappropriate Content
Mar-29-2013 04:52 PM
Hi West,
This thread is AWESOME. Post some more pics of the finished interior when you have a chance please. Did I miss the new upholstry part for the dinette?
Best Regards,
TurtleBax
This thread is AWESOME. Post some more pics of the finished interior when you have a chance please. Did I miss the new upholstry part for the dinette?
Best Regards,
TurtleBax
Options
- Mark as New
- Bookmark
- Subscribe
- Mute
- Subscribe to RSS Feed
- Permalink
- Report Inappropriate Content
Mar-24-2013 09:21 PM
DeadeyeLefty wrote:What item would you like to see pictured?
Good to know that there isn't a standard for solar connections. When you get a chance, would you mind grabbing a pic so I have an idea what to look out for when I see a deal that's too good to be true ?
I've been going back and forth on whether to set up a tilting array or not, given that I'm planning on just maintaining with my wee little panels. Still, it would be a test bed for future upgrades....but I have enough to do as it is...fortunately my mounting arrangement will still let me add that stuff later.
The receiver I've got is 'just' a CR 600...but it sounds pretty darn full to my unedimacated ears...same as the Kenwood KS4006 and Sony TS22 turntable in the living room. Average grade stuff in their day I'm sure but I like the noises they make...:)
Speakers to do them justice are the next on the list...gotta share my music with the neighbourhood!
Fortunately, my music is the same vintage as the equipment...and everyone else in the neighbourhood. 🙂
Since I had time available, I shopped around and bought most of the pieces of the system off E Bay. The panel was a Holiday special from Solarblvd.com. Wiring devices, cable, and connectors are from Waytekwire.com, they are local to me. The mounts I fabricated out of 6061 aluminum profiles found at Discountsteel.com, also local to me. Stainless hinges and hardware came from the True Value hardware store.
A CR-600 is also a great receiver! I've had a CR-1020, R-400, and an R-600 on the bench. I have a Kenwood KA-8150/KT-7550 set that isn't going anywhere although I don't use it often. All of these components are from the "Golden Age" of stereo mfg., '70-'85. This was an era where everything was component-on-board rather than IC based. There is definitely a difference in tone and spatial auditory cueing with the vintage gear.
If you're needing new speakers, build your own. The bang-for-the-buck is in DIY. I built a pair for the Hilton but they turned out too good, lol. Those are now my shop speakers.
Here are the pair that are in my living room, at present:
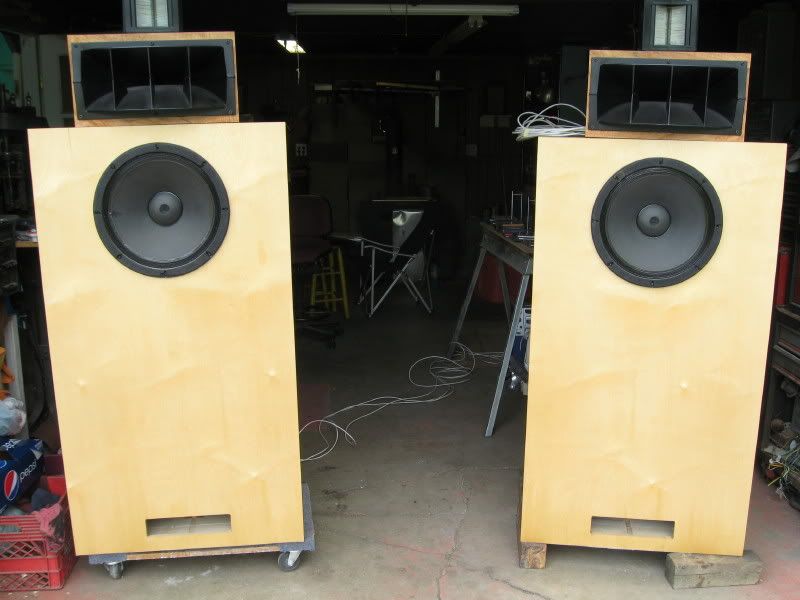
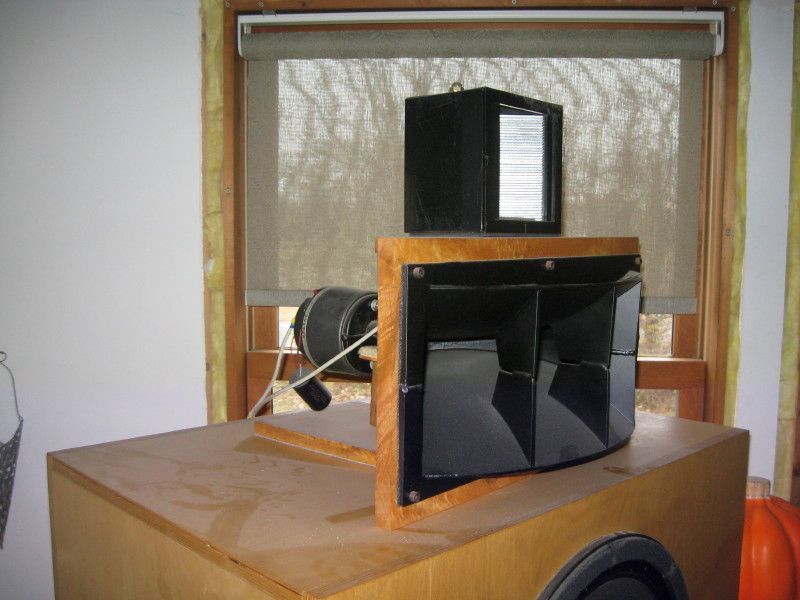
DIY Altec based MLTL boxes with 15" 416-B woofers, 811 aluminum CD horn/802g compression driver, Heil AMT1 high frequency tweeter.
'03 F-250 4x4 CC
'71 Starcraft Wanderstar -- The Cowboy/Hilton
'71 Starcraft Wanderstar -- The Cowboy/Hilton
Options
- Mark as New
- Bookmark
- Subscribe
- Mute
- Subscribe to RSS Feed
- Permalink
- Report Inappropriate Content
Mar-24-2013 08:59 PM
CavemanCharlie wrote:Well thanks, Charlie. Yes, I have a working life, still. It's based on 40 yrs. of fixing things and working with different materials so a lot of this stuff is second nature.:)
Holy S**t your good at this stuff. I hope you have found your calling and have a good job because your a talented dude. Of course, it's taken you a long time on this project but, I'm guessing you have a life/ job outside of just fixing on the Hilton. If you ever need a job and life gets you down head my out my way I'm sure you could find a job somewhere. Sioux Falls SD comes to mind.
'03 F-250 4x4 CC
'71 Starcraft Wanderstar -- The Cowboy/Hilton
'71 Starcraft Wanderstar -- The Cowboy/Hilton
Options
- Mark as New
- Bookmark
- Subscribe
- Mute
- Subscribe to RSS Feed
- Permalink
- Report Inappropriate Content
Mar-24-2013 07:34 PM
Holy S**t your good at this stuff. I hope you have found your calling and have a good job because your a talented dude. Of course, it's taken you a long time on this project but, I'm guessing you have a life/ job outside of just fixing on the Hilton. If you ever need a job and life gets you down head my out my way I'm sure you could find a job somewhere. Sioux Falls SD comes to mind.
Options
- Mark as New
- Bookmark
- Subscribe
- Mute
- Subscribe to RSS Feed
- Permalink
- Report Inappropriate Content
Mar-24-2013 07:11 PM
Good to know that there isn't a standard for solar connections. When you get a chance, would you mind grabbing a pic so I have an idea what to look out for when I see a deal that's too good to be true ?
I've been going back and forth on whether to set up a tilting array or not, given that I'm planning on just maintaining with my wee little panels. Still, it would be a test bed for future upgrades....but I have enough to do as it is...fortunately my mounting arrangement will still let me add that stuff later.
The receiver I've got is 'just' a CR 600...but it sounds pretty darn full to my unedimacated ears...same as the Kenwood KS4006 and Sony TS22 turntable in the living room. Average grade stuff in their day I'm sure but I like the noises they make...:)
Speakers to do them justice are the next on the list...gotta share my music with the neighbourhood!
Fortunately, my music is the same vintage as the equipment...and everyone else in the neighbourhood. 🙂
Options
- Mark as New
- Bookmark
- Subscribe
- Mute
- Subscribe to RSS Feed
- Permalink
- Report Inappropriate Content
Mar-24-2013 05:06 PM
Thanks to all for the kind posts. Recording the restoration helps me out, too.
Might as well update on the solar installation.
The distribution of the 12v system had been on my mind for awhile. I knew I was going to adding more batteries for storage and they would probably be wet cells instead of the AGM type I had already installed. That is still not set in stone but I wanted to plan for a few contingencies. I posted up a "help-me" thread in the Tech issues section and the membership came to the rescue. At the end of the day, I had a working plan:
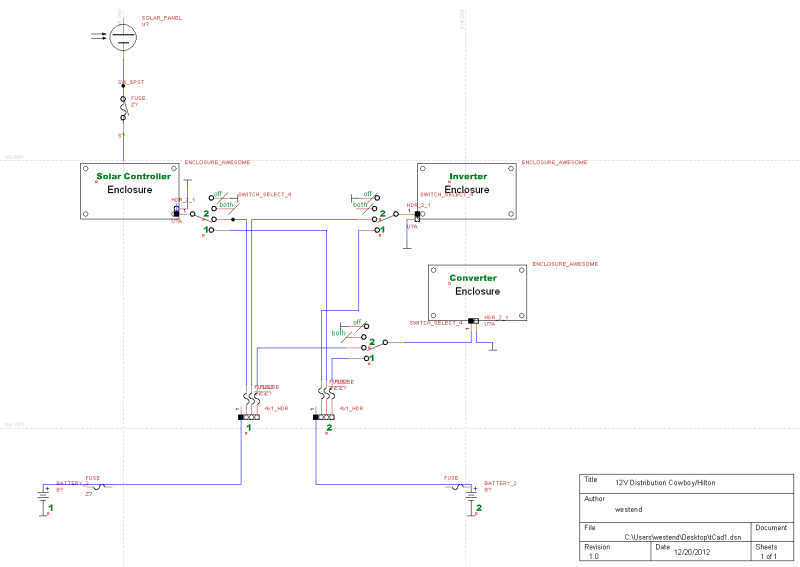
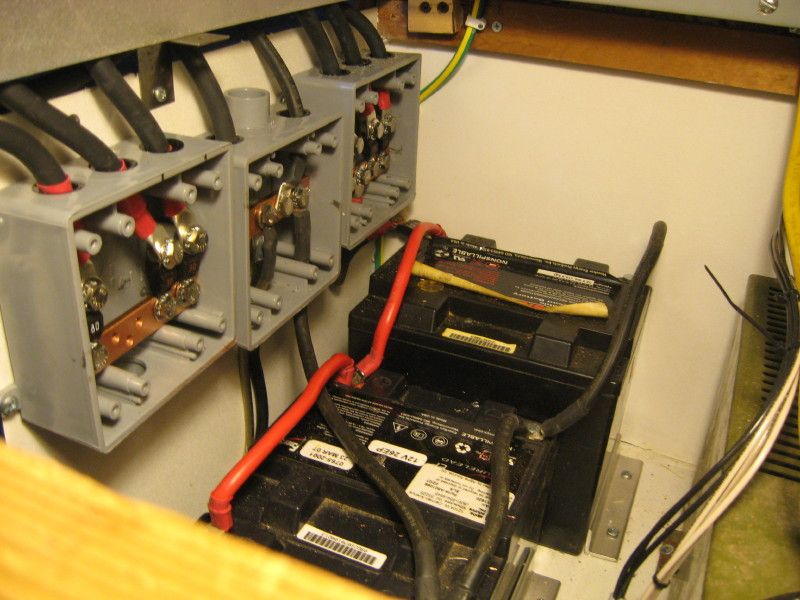
In order to get the variability to charge from the converter, charge from the solar controller, and draw to the inverter using two battery banks, I used three Cole-Hersee battery disconnect switches. The Morningstar Sunsaver MPPT-15 and Samlex inverter are mounted on the same aluminum panel. I havea serial interface cable mounted to the charge controller to datalog and see what's happening with solar. I will be adding a monitor in the future.

Back of panel:
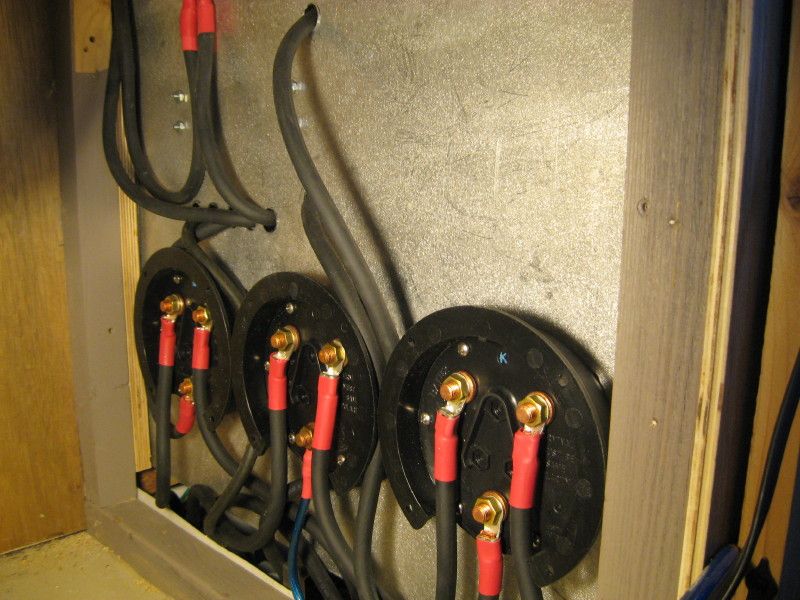
The panel is wired with 4 AWG and I made three bus boxes to handle the distribution:
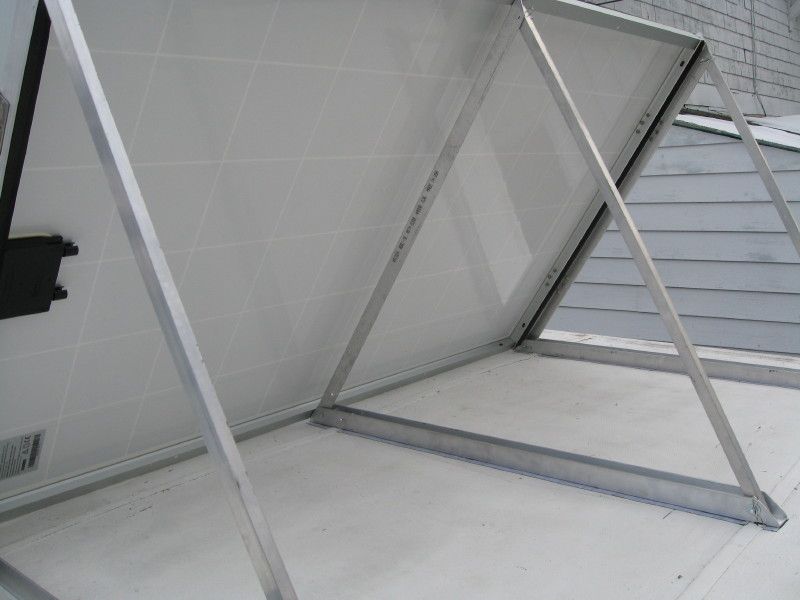
I decided that I wanted to be able to tilt the panel as winter storage at 45 latitude benefits. Also, if I get in a situation that would make tilting to another direction, I wanted to tilt the panel in 4 axis. Member Fire Instructor had done this and shared his photos and posts about how he had done this on his own rig so I was able to follow his lead with a couple of enhancements for my own. Hat's off to FI, he made it easy.
The mounts have three channel pieces that are sealed and bolted into the roof rafters. The tilting apparatus is attached to the module frame with hinges and aluminum angle pieces. Struts were made to hold the panel at the angle needed.
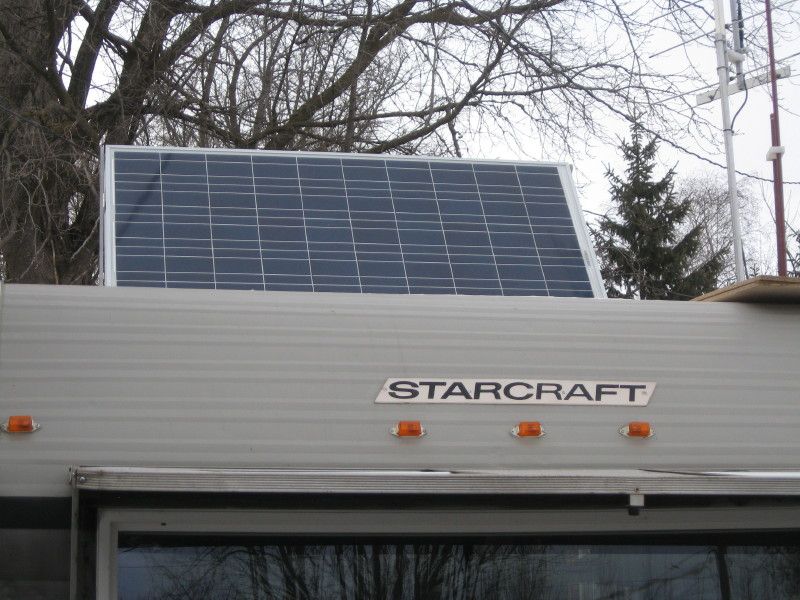
I had a little snafu with panel connection, the terminals on the back of the panel are not MC4, typical for most newer modules. They are some type of Euro connector so I'll be contacting Solarblvd.com to see what I can get from them for connections. The terminal is constructed just like an MC4 connector but is smaller in dimension.
I thought the Hilton would be online with solar, today, but the good news is that the mounts are working, the panel is up and the inverter has been tested to power the dorm fridge, successfully.
@Lefty--That is a nice receiver, the Yamaha Natural Sound series of that age had a really detailed and full sound. Excellent piece of stereo gear that we won't see the likes of, made again. Is it a CR-2024?
Might as well update on the solar installation.
The distribution of the 12v system had been on my mind for awhile. I knew I was going to adding more batteries for storage and they would probably be wet cells instead of the AGM type I had already installed. That is still not set in stone but I wanted to plan for a few contingencies. I posted up a "help-me" thread in the Tech issues section and the membership came to the rescue. At the end of the day, I had a working plan:
In order to get the variability to charge from the converter, charge from the solar controller, and draw to the inverter using two battery banks, I used three Cole-Hersee battery disconnect switches. The Morningstar Sunsaver MPPT-15 and Samlex inverter are mounted on the same aluminum panel. I havea serial interface cable mounted to the charge controller to datalog and see what's happening with solar. I will be adding a monitor in the future.
Back of panel:
The panel is wired with 4 AWG and I made three bus boxes to handle the distribution:
I decided that I wanted to be able to tilt the panel as winter storage at 45 latitude benefits. Also, if I get in a situation that would make tilting to another direction, I wanted to tilt the panel in 4 axis. Member Fire Instructor had done this and shared his photos and posts about how he had done this on his own rig so I was able to follow his lead with a couple of enhancements for my own. Hat's off to FI, he made it easy.
The mounts have three channel pieces that are sealed and bolted into the roof rafters. The tilting apparatus is attached to the module frame with hinges and aluminum angle pieces. Struts were made to hold the panel at the angle needed.
I had a little snafu with panel connection, the terminals on the back of the panel are not MC4, typical for most newer modules. They are some type of Euro connector so I'll be contacting Solarblvd.com to see what I can get from them for connections. The terminal is constructed just like an MC4 connector but is smaller in dimension.
I thought the Hilton would be online with solar, today, but the good news is that the mounts are working, the panel is up and the inverter has been tested to power the dorm fridge, successfully.
@Lefty--That is a nice receiver, the Yamaha Natural Sound series of that age had a really detailed and full sound. Excellent piece of stereo gear that we won't see the likes of, made again. Is it a CR-2024?
'03 F-250 4x4 CC
'71 Starcraft Wanderstar -- The Cowboy/Hilton
'71 Starcraft Wanderstar -- The Cowboy/Hilton
Options
- Mark as New
- Bookmark
- Subscribe
- Mute
- Subscribe to RSS Feed
- Permalink
- Report Inappropriate Content
Mar-24-2013 09:01 AM
Hey Westy!
Finally finished reading the whole thread. Great job and thanks for logging it all.
No updates in a while, so...
Have you had the chance for 'sea trials' yet ?
I'm always interested in what folks would do differently next time.
How did the distro panel come together ?
Hehe...funny you mention vintage audio. I'm late to that game, but this is my shop stereo...
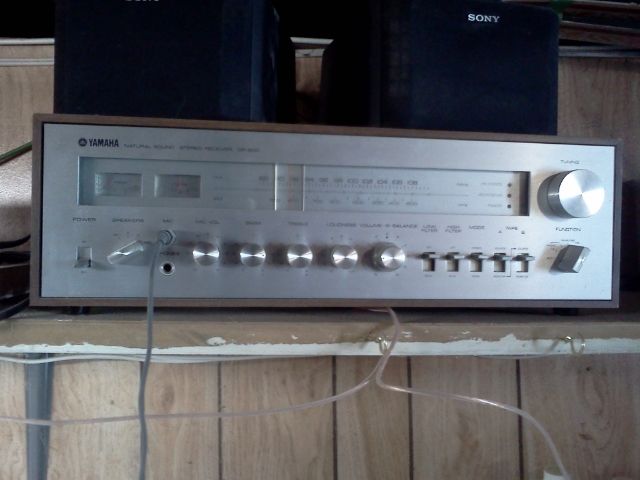
The living room has an old Kenwood and a projection TV too, lol.
Finally finished reading the whole thread. Great job and thanks for logging it all.
No updates in a while, so...
Have you had the chance for 'sea trials' yet ?
I'm always interested in what folks would do differently next time.
How did the distro panel come together ?
Hehe...funny you mention vintage audio. I'm late to that game, but this is my shop stereo...
The living room has an old Kenwood and a projection TV too, lol.
Options
- Mark as New
- Bookmark
- Subscribe
- Mute
- Subscribe to RSS Feed
- Permalink
- Report Inappropriate Content
Jan-14-2013 04:01 PM
The progress is looking good. Let us know how it works out while camping. My bet is that it will work out very well.
Ford F-350 4x4 Diesel
1988 Avion Triple Axle Trailer
1969 Avion C-11 Camper
1988 Avion Triple Axle Trailer
1969 Avion C-11 Camper
Options
- Mark as New
- Bookmark
- Subscribe
- Mute
- Subscribe to RSS Feed
- Permalink
- Report Inappropriate Content
Jan-14-2013 02:37 PM
Just came across your post today and was so rapt by it that I have already read through the entire post. What an awesome job. Inspiring yet boggling.
Great work. thanks a bunch for sharing and for all the DIY info.
Craig
Great work. thanks a bunch for sharing and for all the DIY info.
Craig
Options
- Mark as New
- Bookmark
- Subscribe
- Mute
- Subscribe to RSS Feed
- Permalink
- Report Inappropriate Content
Jan-03-2013 02:29 PM
Thanks, pausan! Yup, high of around 15f, today, but I wanted to get the solar install moving along.
Hmmm, one year? I guess I'm glad it all just took a year to get done ...or..I'm glad it got done, no matter how long it took, lol. The solar/battery installation and the waste tank enclosure will be the last major parts of this restoration. I still have other little odds and ends that I want to finish but I'm learning that TT ownership is sometimes about never "being done".
Hmmm, one year? I guess I'm glad it all just took a year to get done ...or..I'm glad it got done, no matter how long it took, lol. The solar/battery installation and the waste tank enclosure will be the last major parts of this restoration. I still have other little odds and ends that I want to finish but I'm learning that TT ownership is sometimes about never "being done".
'03 F-250 4x4 CC
'71 Starcraft Wanderstar -- The Cowboy/Hilton
'71 Starcraft Wanderstar -- The Cowboy/Hilton
Options
- Mark as New
- Bookmark
- Subscribe
- Mute
- Subscribe to RSS Feed
- Permalink
- Report Inappropriate Content
Jan-03-2013 12:45 PM
Good going westend - glad to see you are out in the cold doing some work!
Do you realize you're coming up on the one year mark for this thread? :C
Susan & Ben [2004 Roadtrek 170]
href="https://sites.google.com/view/pasusan-trips/home" target="_blank">Trip Pics
Do you realize you're coming up on the one year mark for this thread? :C
Susan & Ben [2004 Roadtrek 170]
href="https://sites.google.com/view/pasusan-trips/home" target="_blank">Trip Pics
Options
- Mark as New
- Bookmark
- Subscribe
- Mute
- Subscribe to RSS Feed
- Permalink
- Report Inappropriate Content
Jan-03-2013 08:28 AM
Finally made a little progress on the solar wiring. I installed the conduit on the side of the Hilton that will hold the 4 ga. wires from the combiner box on top to the distribution panel and the controller, below. This was a tight fit because I had a stud in this location and wanted to bolt the conduit clamps to that stud. There also happened to be a 12-2 AC wire in the exact center of the bottom entrance. I managed to just nick the wire when drilling the first hole. A bit of OEM (Oops Engineer Modification) and all is well. 😉
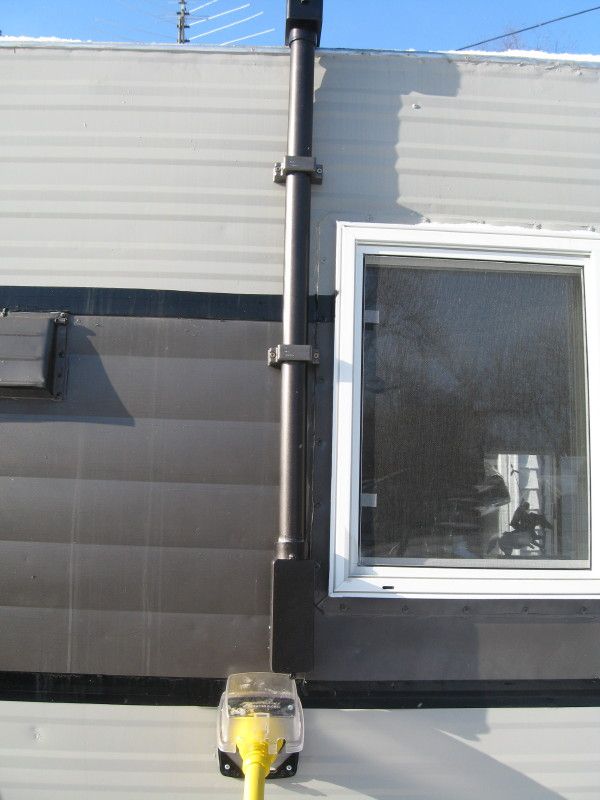
I did remove a little too much paint around the bottom LB on the conduit but I'll touch that up on a warmer day. I've got to visit a couple of electrical distributors to pick up the rest of the wire and sundry bits, also need to make the mounting rack for the panel.
I did remove a little too much paint around the bottom LB on the conduit but I'll touch that up on a warmer day. I've got to visit a couple of electrical distributors to pick up the rest of the wire and sundry bits, also need to make the mounting rack for the panel.
'03 F-250 4x4 CC
'71 Starcraft Wanderstar -- The Cowboy/Hilton
'71 Starcraft Wanderstar -- The Cowboy/Hilton
Options
- Mark as New
- Bookmark
- Subscribe
- Mute
- Subscribe to RSS Feed
- Permalink
- Report Inappropriate Content
Dec-23-2012 08:19 PM
Made a bit of progress on the solar system. I pulled a bit of hair trying to figure out how I was going to distribute the 12v among the solar controller, the inverter, the converter, and the two battery banks. I posted a "Help me" thread in the "Tech issues" section of the forum and the experienced hands helped me through the design.
This is probably the second iteration of the wiring:
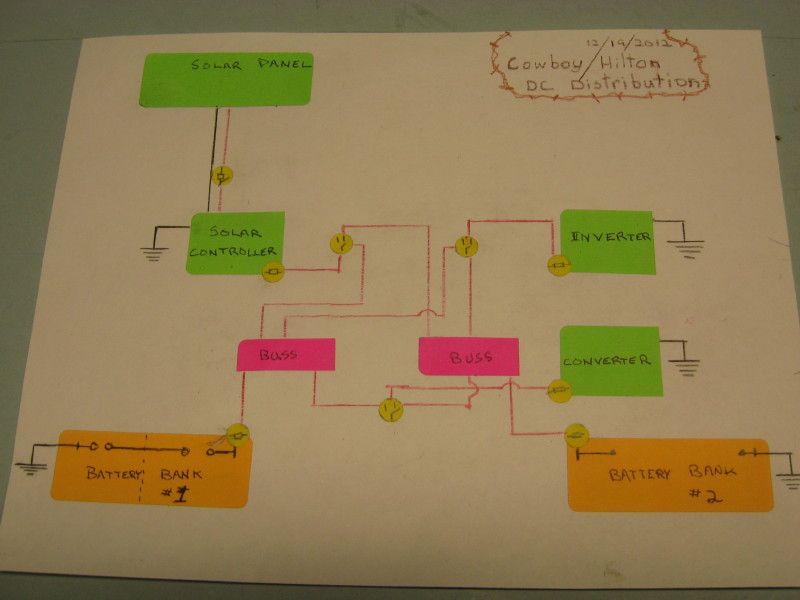
One of the guys linked me to some schematic software and I drew another plan, this time moving the fusing to the positive busses from the battery banks:
The plan is to move forward with this distribution panel as drawn except I am swapping the positions of the inverter and solar controller, it is a better physical layout with that move. Here is a mockup of the two devices and the three battery selector switches that will make everything work:
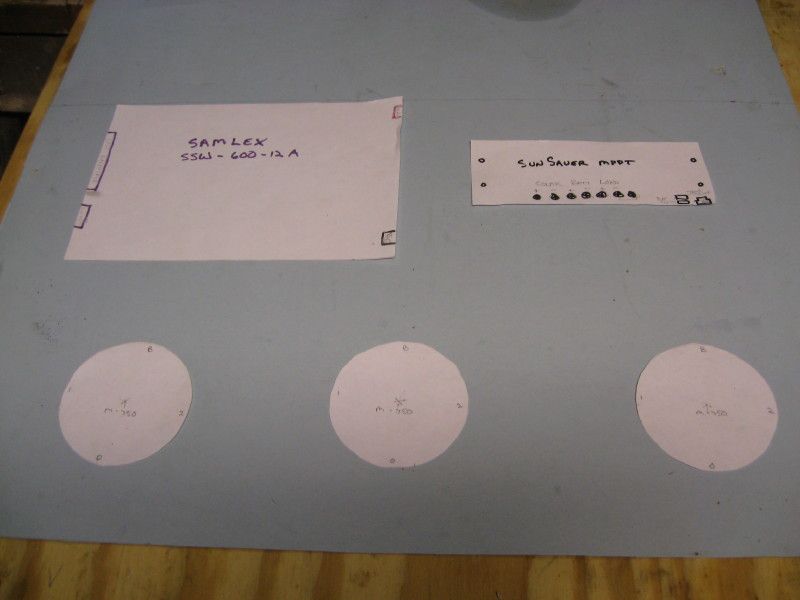
The blue paper is cut to the size of an aluminum sheet I have that will be the panel board. The round cutouts are the selector switches. To the upper left is the inverter and to the upper right is the solar controller. The converter is mounted to the floor of the compartment the distro panel will be mounted in.
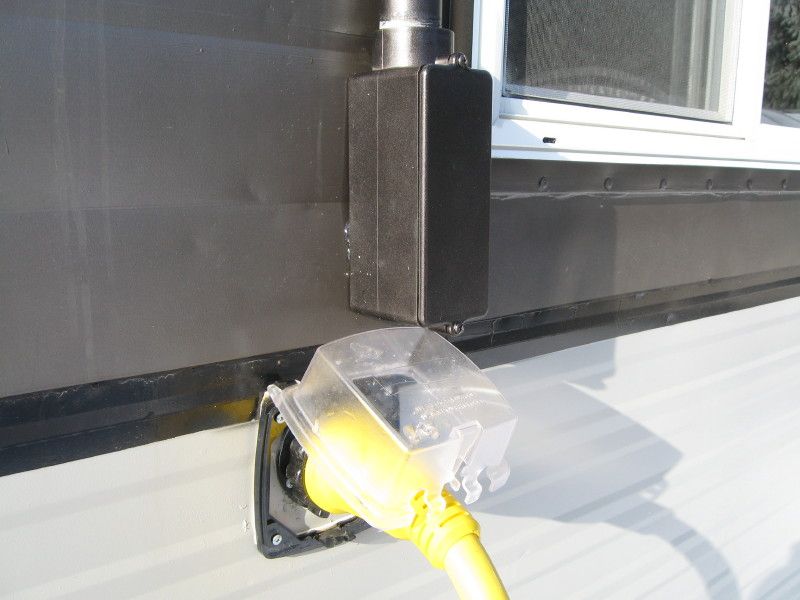
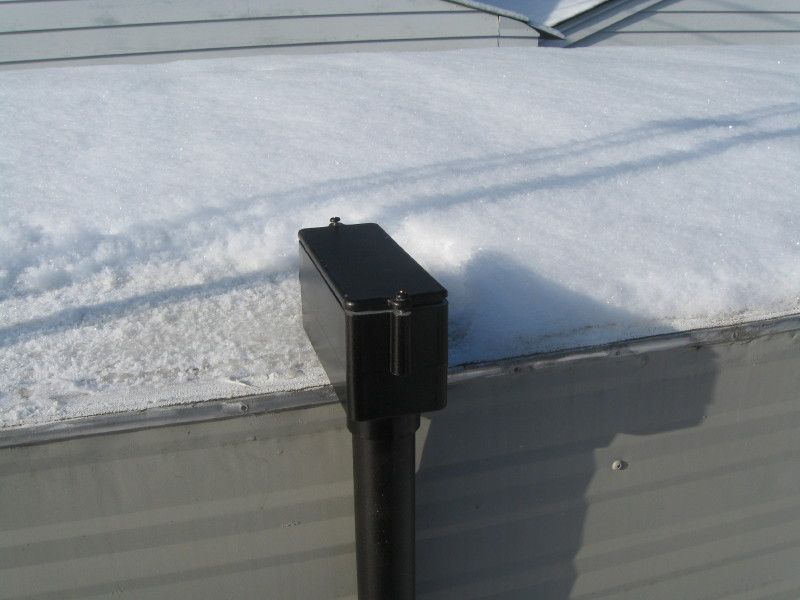
I also made a combiner box for the lead-in wires from the solar panel. The combiner box will allow me to run the wire from the panel and future panels to this box. I will have #4 AWG installed from the box to the controller below. This was made from a 1 1/4" PVC LB and some lug strips from a load center I had laying around. I will be installing a water-proof fitting on the end for the 10 AWG MC4 panel wires.
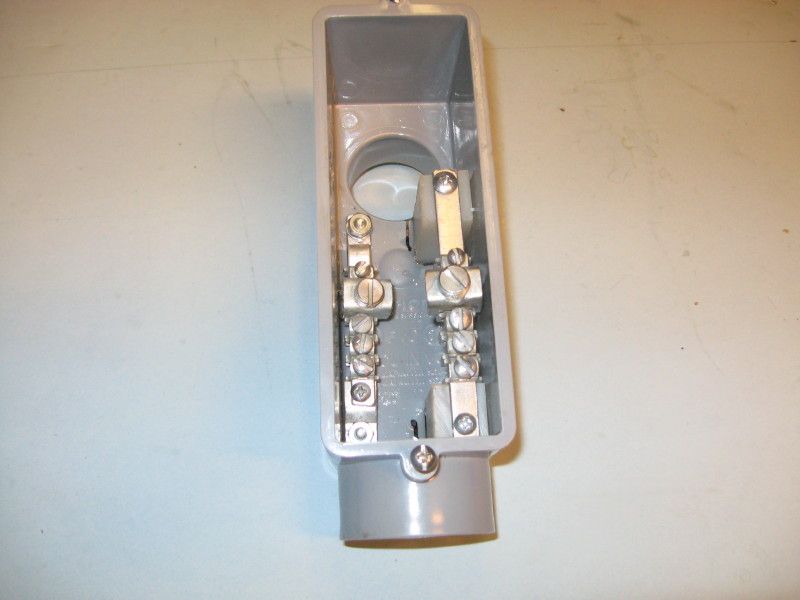
This LB will be glued up to a piece of 1 1/4" PVC conduit that is mounted on the driver's side of the Hilton, next to the window. The wire entrance will be adjacent to the shore power inlet. I chose to make the entrance on the side because I have the roof sealed and don't want a hole there, trying to wire from the ceiling to the compartment where the distribution exists would have been a nightmare, and I already have things protruding from the exterior wall.
This is probably the second iteration of the wiring:
One of the guys linked me to some schematic software and I drew another plan, this time moving the fusing to the positive busses from the battery banks:
The plan is to move forward with this distribution panel as drawn except I am swapping the positions of the inverter and solar controller, it is a better physical layout with that move. Here is a mockup of the two devices and the three battery selector switches that will make everything work:
The blue paper is cut to the size of an aluminum sheet I have that will be the panel board. The round cutouts are the selector switches. To the upper left is the inverter and to the upper right is the solar controller. The converter is mounted to the floor of the compartment the distro panel will be mounted in.
I also made a combiner box for the lead-in wires from the solar panel. The combiner box will allow me to run the wire from the panel and future panels to this box. I will have #4 AWG installed from the box to the controller below. This was made from a 1 1/4" PVC LB and some lug strips from a load center I had laying around. I will be installing a water-proof fitting on the end for the 10 AWG MC4 panel wires.
This LB will be glued up to a piece of 1 1/4" PVC conduit that is mounted on the driver's side of the Hilton, next to the window. The wire entrance will be adjacent to the shore power inlet. I chose to make the entrance on the side because I have the roof sealed and don't want a hole there, trying to wire from the ceiling to the compartment where the distribution exists would have been a nightmare, and I already have things protruding from the exterior wall.
'03 F-250 4x4 CC
'71 Starcraft Wanderstar -- The Cowboy/Hilton
'71 Starcraft Wanderstar -- The Cowboy/Hilton
Options
- Mark as New
- Bookmark
- Subscribe
- Mute
- Subscribe to RSS Feed
- Permalink
- Report Inappropriate Content
Dec-11-2012 07:57 AM
JiminDenver wrote:
Every since I found our panels, I have been mentally mounting them. (boy that sounds bad lol )
I have thought of ways to make them tilt and rotate in a effort to get the most out of them. Most recently I thought of using large TV turn tables for the rotating part but as it gets more and more complicated I realized I really want to mount them flat and not have to get up on the roof or worry about the wind ripping them off. The 230w showed 8.8a max and the 220w should be less, so mounted flat they should be within the abilities of the Eco-worthy. Running them portable next season will tell me if flat will do or not.
Yes, there is a lot of elegance to installing them flat.
I'm at 45 Lat. N (and may go even further North) so everything I've read tells me tilting is going to get me at least 15% more in the Winter. I too, would dread getting on a ladder, frequently, messing around with tilt mechanisms. I was giving some thought to linear actuators to raise and lower the panel but I think I'd rather have a solid fastening system over ease of operation. Another consideration is how often you need to deploy the panel into tilt? If someone was going to camp for a week in the same spot, two trips to the roof doesn't seem excessive. Another aspect of the Hilton, currently, is the deployment of the antennas. As it is, I'll probably be breaking out the ladder to get those deployed so it really isn't any more work to tilt, other than removing a pair of star wheel bolts and securing the tilt strut. Sounds easy.....I wonder what I'll think about that during a snow storm, lol.
'03 F-250 4x4 CC
'71 Starcraft Wanderstar -- The Cowboy/Hilton
'71 Starcraft Wanderstar -- The Cowboy/Hilton


