- Good Sam Community
- Groups
- Travel Trailer Group
- Forum
- Re: My belly is sagging...
- Subscribe to RSS Feed
- Mark Topic as New
- Mark Topic as Read
- Float this Topic for Current User
- Bookmark
- Subscribe
- Mute
- Printer Friendly Page
My belly is sagging...
- Mark as New
- Bookmark
- Subscribe
- Mute
- Subscribe to RSS Feed
- Permalink
- Report Inappropriate Content
Feb-01-2014 07:52 AM
2016 Winnebago View 24M
2015 Harley Heritage Softail as toad
Retired:
2007 Titan LE with the Big Tow Package
2010 Rockwood 8315BSS
2008 Suzuki GZ 250-Response to 3/4 Life Crisis :C
- Mark as New
- Bookmark
- Subscribe
- Mute
- Subscribe to RSS Feed
- Permalink
- Report Inappropriate Content
Apr-13-2014 06:08 PM
mrekim wrote:JBarca wrote:
Taped over edge to create a hem seal then put both up onto the bottom of the camper.
OK, I guess I was a little confused. I thought you only "hemmed" the area by the tires. I was wondering if you just depended on compression for the rest.
Sorry, need to clarify. I did the entire wheel well area as even the coroplast would get water in the flutes. In my case there this is about ~ 6 feet that is fully taped by the wheels. The other areas I just used ~ 6" long strips to hold the Reflectix to the coroplast to get it up. I have no water concerns in these areas and the sandwich compresses enough to not be a problem.
- Mark as New
- Bookmark
- Subscribe
- Mute
- Subscribe to RSS Feed
- Permalink
- Report Inappropriate Content
Apr-13-2014 06:02 PM
JBarca wrote:
Taped over edge to create a hem seal then put both up onto the bottom of the camper.
OK, I guess I was a little confused. I thought you only "hemmed" the area by the tires. I was wondering if you just depended on compression for the rest.
JBarca wrote:
LOL.... I was shocked the radiant heat off the ducts actually was that warm. In my case the furnace has to run when cold weather (below freezing) camping or the tank compartment will not be indirectly heated.
WOW
Is that the only under floor duct - maybe not insulated on purpose?
- Mark as New
- Bookmark
- Subscribe
- Mute
- Subscribe to RSS Feed
- Permalink
- Report Inappropriate Content
Apr-13-2014 05:49 PM
mrekim wrote:LOL.... I was shocked the radiant heat off the ducts actually was that warm. In my case the furnace has to run when cold weather (below freezing) camping or the tank compartment will not be indirectly heated.JBarca wrote:
I am using Reflectix insulation on the inside of the cover and hem the seams by the wheels so water does not work its way into the Reflectix.
Hem = silicon seal? No, not silicone. I used Gorilla tape . Stuck 1" to the Coroplast, then fold over onto the Reflectix to hold it in place and keep water from getting the Coroplast and ReflectrixJBarca wrote:
The Coroplast cover them compresses the Reflectix on the frame mount to make an effective enough seal.
Do you just sandwich it in there or affix to frame or Corplast? See response above. Taped over edge to create a hem seal then put both up onto the bottom of the camper.JBarca wrote:
If I was to use the foam along the entire perimeter I was afraid I would almost destroy Corplast if I ever wanted to get it off to service the under side of the camper. My slide drive motor is in there and the holding tanks.
Yes, That's why I'm looking to steal some ideas. I had some work done and they didn't seal up the Coroplast at all. OK I know what you are referring to. I think anyway (the camper work that is). The coroplast when brand new is stiffer pending how thick it is. Once it goes up and down a few times it is not as rigid. PS steal all the ideas you can from my mods stuff. Willing to shareJBarca wrote:
I have tested it down to 19F and the tank compartment is still at 46F as the lowest temp in the middle of the night. The highest was like 86F when the furnace kicked on.
Ha - you're going to need to get that temp sensor hooked up to a electronic damper to keep from having only hot water.
- Mark as New
- Bookmark
- Subscribe
- Mute
- Subscribe to RSS Feed
- Permalink
- Report Inappropriate Content
Apr-13-2014 05:00 PM
JBarca wrote:
I am using Reflectix insulation on the inside of the cover and hem the seams by the wheels so water does not work its way into the Reflectix.
Hem = silicon seal?
JBarca wrote:
The Coroplast cover them compresses the Reflectix on the frame mount to make an effective enough seal.
Do you just sandwich it in there or affix to frame or Corplast?
JBarca wrote:
If I was to use the foam along the entire perimeter I was afraid I would almost destroy Corplast if I ever wanted to get it off to service the under side of the camper. My slide drive motor is in there and the holding tanks.
Yes, That's why I'm looking to steal some ideas. I had some work done and they didn't seal up the Coroplast at all.
JBarca wrote:
I have tested it down to 19F and the tank compartment is still at 46F as the lowest temp in the middle of the night. The highest was like 86F when the furnace kicked on.
Ha - you're going to need to get that temp sensor hooked up to a electronic damper to keep from having only hot water.
- Mark as New
- Bookmark
- Subscribe
- Mute
- Subscribe to RSS Feed
- Permalink
- Report Inappropriate Content
Apr-13-2014 04:28 PM
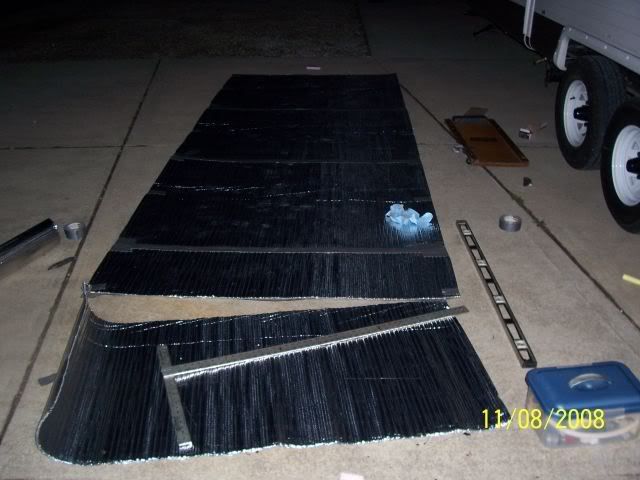
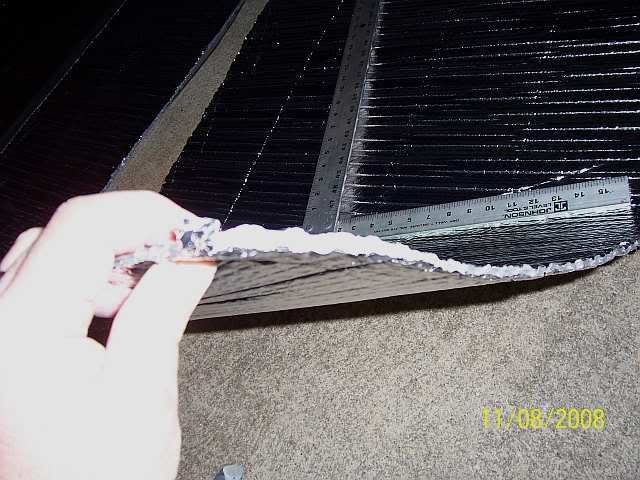
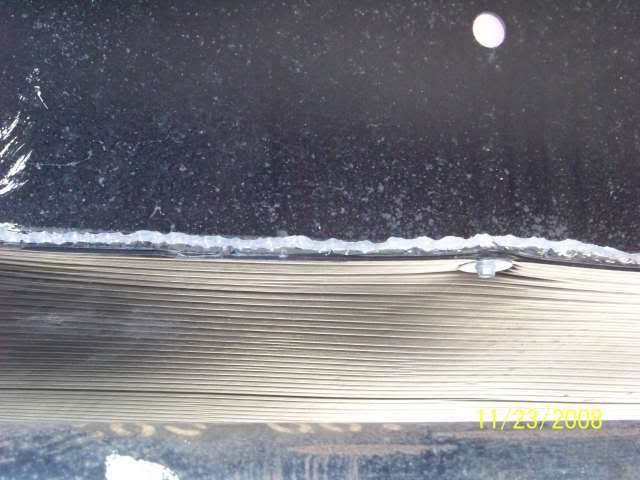
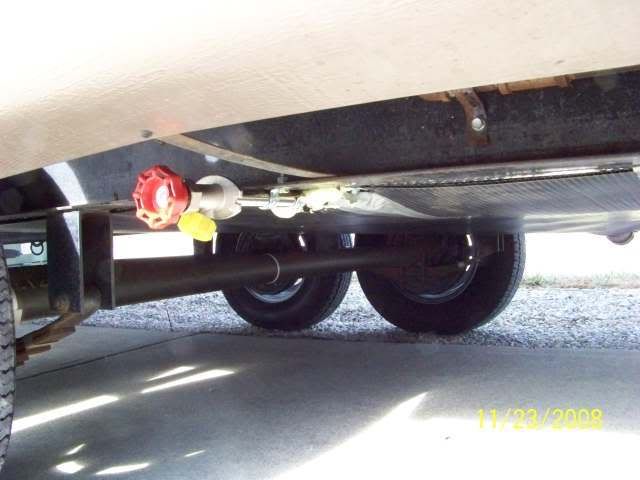
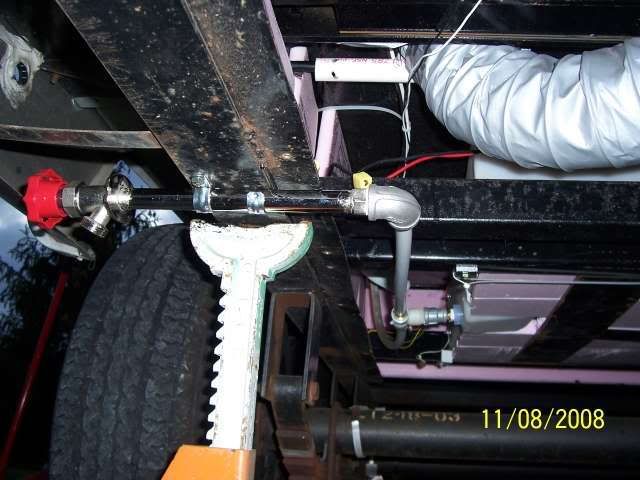
This was part of making the heated tank compartment more dependable. I could not find anyone who could tell me how cold out I can go. So I fixed up the insulation system to what I felt was a whole lot better and installed a air temp sensor inside the compartment to prove to myself how cold I can go. I have tested it down to 19F and the tank compartment is still at 46F as the lowest temp in the middle of the night. The highest was like 86F when the furnace kicked on.
- Mark as New
- Bookmark
- Subscribe
- Mute
- Subscribe to RSS Feed
- Permalink
- Report Inappropriate Content
Apr-13-2014 04:16 PM
mrekim wrote:
Did you then use expanding foam to seal everything back up?
I only used the foam where I had a pipe etc that creates an air space. I am using Reflectix insulation on the inside of the cover and hem the seams by the wheels so water does not work its way into the Reflectix.
The Coroplast cover them compresses the Reflectix on the frame mount to make an effective enough seal.
If I was to use the foam along the entire perimeter I was afraid I would almost destroy Corplast if I ever wanted to get it off to service the under side of the camper. My slide drive motor is in there and the holding tanks.
- Mark as New
- Bookmark
- Subscribe
- Mute
- Subscribe to RSS Feed
- Permalink
- Report Inappropriate Content
Apr-13-2014 04:13 PM
JBarca wrote:I did something similar when I installed pipe insulation and heat tape to all of my plumbing.
I do not have your brand camper, but have dealt with the issue of sagging Coroplast (plastic corrugated sheet) belly cover.
Here is a pic of ours a year after we bought the camper. It had a slight sag in it then and the camper was 4 years old on this pic.
On ours Sunline welded on a 1/16" x 2" flat strip that hung inside I shape main frame rails. They used 1/4" self tapping screws to hold the cover on. See here
I did a qty of work in the enclosed tank compartment and after taking it on and off a few times, the sag became worse.
The structure of this Coroplast is not very strong, however it is light , makes a cover and will not rot. But it does sag over time.
I had to do something with the sag so I make up a few holders to span the width of the frame rails and added fender washer over the screws. Went into Lowes/Home Depot to look at options and that did not cost a small fortune. Found 1/2" x 1 1/2" wide pressure treated wood strips and 3/4" EMT conduit. I used a few stainless steel hose clamps to hold the flat strip to the conduit then bolted the whole thing to the main frame rails. Note: Drill the holes towards the center of the web, not on the outside.
I wanted something more elegant and was going to change it out at a later date, however that time has not yet come and probably won't. They work well. I have them spaced about every 30"
Just passing this along as an option in case someone needs it.
Hope this helps
John
I removed the coroplast completely, and used 1x4 pieces of pine cut to a length that would fit above the bottom of the frame rails crosswise. You gotta put them in at a angle, then straighten them out so they rest on the inside of the bottom beam. On some, there was a hole already from the previous coroplast install so I put a screw thru it into the pine to secure it, but it really isn't needed.
I cut the coroplast into smaller easier to remove sections of 4-6 ft.
And over lapped it front to rear so the wind can't catch it. Everywhere there is a overlap, there is a pine board to screw into, and some in the middle of the bigger sections.
Now there is no sag, and access for repairs etc. is easy
100% boondocking
2021 Grand Design Momentum 398M
2 bathrooms, no waiting
104 gal grey, 104 black,158 fresh
FullBodyPaint, 3,8Kaxles, DiscBrakes
17.5LRH commercial tires
1860watts solar,800 AH Battleborn batterys
2020 Silverado HighCountry CC DA 4X4 DRW
- Mark as New
- Bookmark
- Subscribe
- Mute
- Subscribe to RSS Feed
- Permalink
- Report Inappropriate Content
Apr-13-2014 03:46 PM
- Mark as New
- Bookmark
- Subscribe
- Mute
- Subscribe to RSS Feed
- Permalink
- Report Inappropriate Content
Feb-02-2014 04:45 PM
Even if we don't need it your posts are always worth a read as there is simply a wealth of information provided - complete with pictures!
Thanks for taking your valuable time to do this.
Wayne
2014 Flagstaff Super Lite 27RLWS Emerald Ed. | Equal-i-zer 1200/12,000 4-point WDH
2010 GMC Sierra 1500 SLE 5.3L 6-speed auto | K&N Filter | Hypertech Max Energy tune | Prodigy P3
_
- Mark as New
- Bookmark
- Subscribe
- Mute
- Subscribe to RSS Feed
- Permalink
- Report Inappropriate Content
Feb-02-2014 03:19 PM
Here is a pic of ours a year after we bought the camper. It had a slight sag in it then and the camper was 4 years old on this pic.
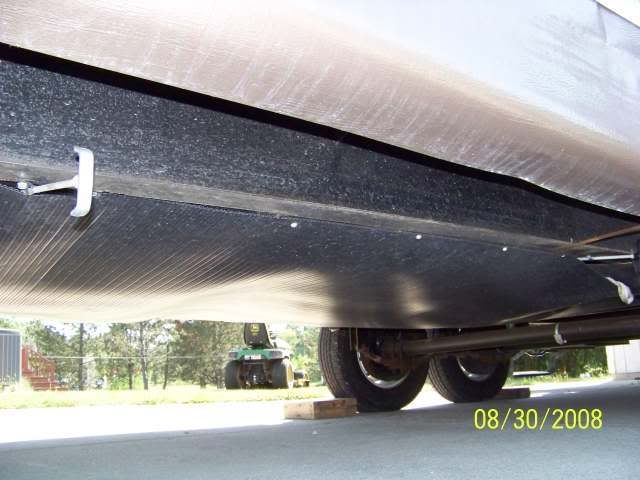
On ours Sunline welded on a 1/16" x 2" flat strip that hung inside I shape main frame rails. They used 1/4" self tapping screws to hold the cover on. See here
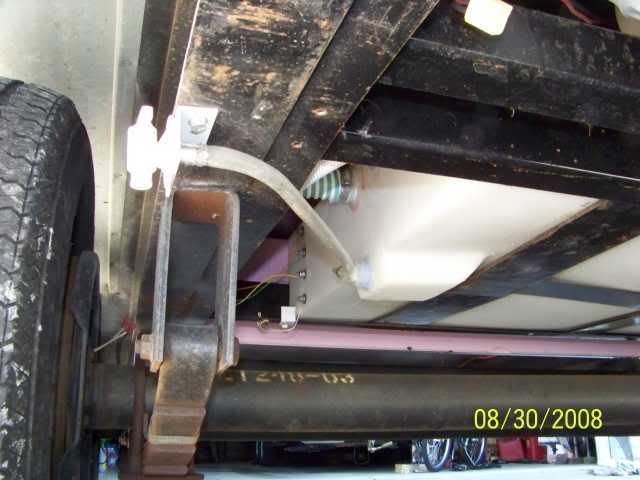
I did a qty of work in the enclosed tank compartment and after taking it on and off a few times, the sag became worse.
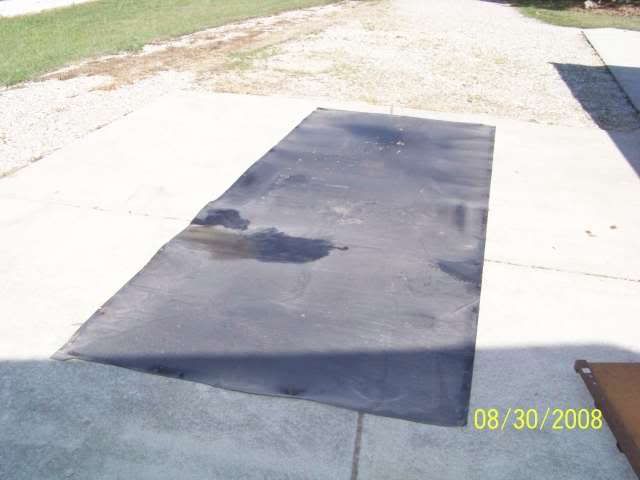
The structure of this Coroplast is not very strong, however it is light , makes a cover and will not rot. But it does sag over time.
I had to do something with the sag so I make up a few holders to span the width of the frame rails and added fender washer over the screws. Went into Lowes/Home Depot to look at options and that did not cost a small fortune. Found 1/2" x 1 1/2" wide pressure treated wood strips and 3/4" EMT conduit. I used a few stainless steel hose clamps to hold the flat strip to the conduit then bolted the whole thing to the main frame rails. Note: Drill the holes towards the center of the web, not on the outside.
I wanted something more elegant and was going to change it out at a later date, however that time has not yet come and probably won't. They work well. I have them spaced about every 30"
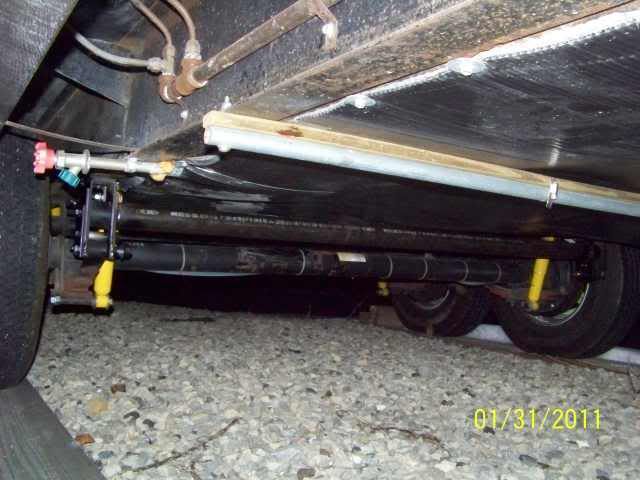
Just passing this along as an option in case someone needs it.
Hope this helps
John
- Mark as New
- Bookmark
- Subscribe
- Mute
- Subscribe to RSS Feed
- Permalink
- Report Inappropriate Content
Feb-02-2014 01:31 PM
Got to a CG and son noticed the underbelly hanging on one side.
It had worked itself off the frame 'shelf' and dropped. There wasn't a single fastener installed anywhere....guess they just jam the material to one side of the frame, bend it until it pops onto the opposite side and call it good 😞
Whilst under the trailer to repair it I noticed that two of the nuts from the straps that secure the water tank onto their 'ready-rod' supports had completely fallen off....hence a bit of a saggy tank.
Re-secured the water tank and then added self-tapping screws (pre-drilled the beam) and large washers wherever I could find a cross-member to keep the underbelly up.
Even with that, there were spots where the underbelly appeared to be sagging, but it was just for it to get under the holding tanks.
- Mark as New
- Bookmark
- Subscribe
- Mute
- Subscribe to RSS Feed
- Permalink
- Report Inappropriate Content
Feb-02-2014 01:23 PM
Gsturner wrote:
(Also noticed wind sucked the cap off the end of the bumper!).
I have had good luck so far with this.
Wayne
2014 Flagstaff Super Lite 27RLWS Emerald Ed. | Equal-i-zer 1200/12,000 4-point WDH
2010 GMC Sierra 1500 SLE 5.3L 6-speed auto | K&N Filter | Hypertech Max Energy tune | Prodigy P3
_
- Mark as New
- Bookmark
- Subscribe
- Mute
- Subscribe to RSS Feed
- Permalink
- Report Inappropriate Content
Feb-02-2014 01:16 PM
2016 Winnebago View 24M
2015 Harley Heritage Softail as toad
Retired:
2007 Titan LE with the Big Tow Package
2010 Rockwood 8315BSS
2008 Suzuki GZ 250-Response to 3/4 Life Crisis :C
- Mark as New
- Bookmark
- Subscribe
- Mute
- Subscribe to RSS Feed
- Permalink
- Report Inappropriate Content
Feb-01-2014 10:14 AM
Dale
Wife, myself, and Oreo the Malshi


