- Good Sam Community
- Groups
- Travel Trailer Group
- Forum
- Re: RV Roof Reseal
- Subscribe to RSS Feed
- Mark Topic as New
- Mark Topic as Read
- Float this Topic for Current User
- Bookmark
- Subscribe
- Mute
- Printer Friendly Page
RV Roof Reseal
- Mark as New
- Bookmark
- Subscribe
- Mute
- Subscribe to RSS Feed
- Permalink
- Report Inappropriate Content
Aug-20-2016 10:44 AM
I keep thinking, if I do the reseal myself, I could put that $325 towards a proper rv cover. However, the reseal brings up many questions.
1) They say it needs a reseal. What, if any, questions should I ask the service department? Like...show me where it needs to be resealed?
2) When they reseal, do they remove the prior seal and reseal or do they just add more caulk over the former seal? Seems I can do that myself?
3) From those of you who have done this before, is it a pain in the ass that I should just go ahead and pay to have done properly or is it one of those...I-really-should-have-done-it-myself...kind of things?
Any and all advice would be greatly appreciated.
Oh! And the sun has totally torched my decals...so I may ask for them to go ahead and remove those while they are at it. Just the ones at the very front - all cracked and peeled. I tried and I am worried I will mess up the fiberglass.
Were they just cheaply made and applied or does everyone have that problem?
Thanks everyone!
Samantha
Co-pilot, Brodie (son)
2009 GMC Yukon 5.3 4WD
2014 Nomad 241 and loving it!!
- Mark as New
- Bookmark
- Subscribe
- Mute
- Subscribe to RSS Feed
- Permalink
- Report Inappropriate Content
Aug-30-2016 07:19 AM
I used a 4" grinder with wire brush to remove the bulk of the nastiness. I then used mineral spirits followed by lacquer thinner to remove the rest. Along the way, I discovered 3M caulk remover which works great for removing beads of caulk.
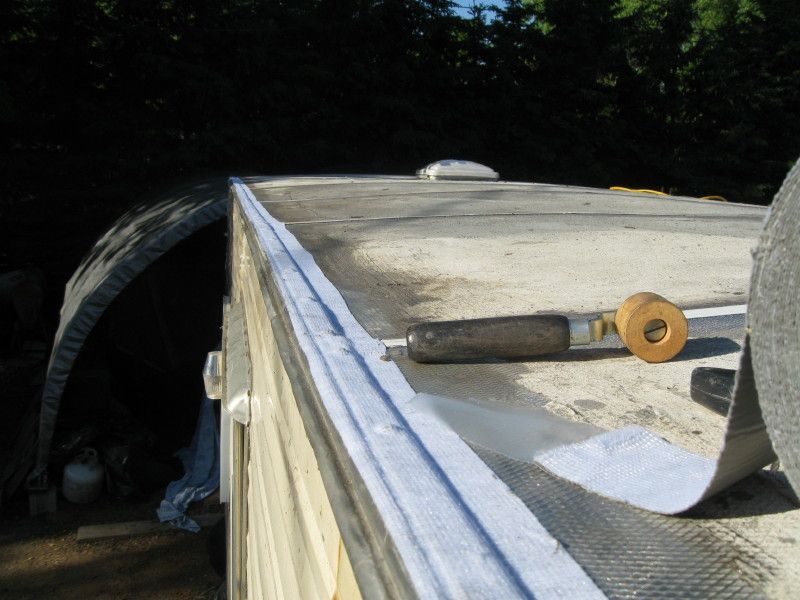
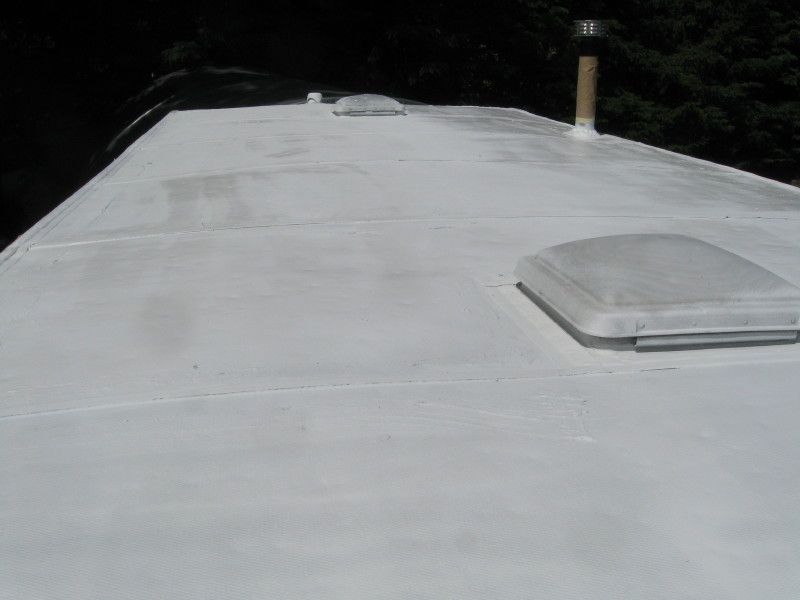
After the sealant removal, I installed Eternabond tapes and then sprayed an acrylic roof coating. Everything is still in good shape four years later. I may get up there and spray on an additional coat of acrylic coating as it's easy to do.
Eternabond installation:

Finished roof:

'71 Starcraft Wanderstar -- The Cowboy/Hilton
- Mark as New
- Bookmark
- Subscribe
- Mute
- Subscribe to RSS Feed
- Permalink
- Report Inappropriate Content
Aug-30-2016 12:38 AM
93Cobra2771 wrote:
If done correctly, the existing caulk is removed, and new dicor self leveling caulk is applied. Most manufacturers say to do this on a yearly basis. You can also apply a new layer over an existing layer, but it is generally suggested to only do it once like that.
It is a bit tedious to do, but can be done if you are decently handy and feel up to the task. Materials wise, you can expect anywhere from 8-14 tubes of self leveling dicor. It will vary according to how heavy you lay it on, and how many items you have stuck through your roof (vents, etc).
I have done a couple. I personally went with eternabond tape over all my seams, so I never have to worry about the sealing on my roof again.
Materials for eternabond will be less that what you will spend at the dealer. Plan on a couple of good weekends to apply it correctly, but it is so worth it in the end.
I agree with all the points made by cobra, especailly the part about removing the old sealant and using Eternabond for a one time permanent reseal that should outlast the life of the roof. I did this over 8 years ago and haven't had to touch anything on the roof since then except to replace two plumbing vent caps just last week which was a breeze. I simply cut the Eternabond right at the edge of the old vent flange, left all the other Eternabond there, removed the old vent, put the new one on using some double sided Eternabond between the new flange and the roof w/o even having to screw it into the roof and it sat right down inside the old area. I then put some new Eternabond roof seal over the new vent flange and up onto the old Eternabond tape and was good to go. Took about 30min per vent and most of that time was removing most of the old butyl caulk that was used on the original vent flange between it and the roof and sort of smoothing out that area so the new double sided Eternabond on my new vent flange would adhere to the roof area good.
Many, many use the more Dicor method, but I don't like that, especially if adding more ontop of what is already there. In many cases the way the Dicor is applied at the factory like around vents you already have an area where pooling had happen right next to the vent vertical flange part which I don't like and IMO if you have caulk that is cracked there is no way to clean all the dirt and grime out of that crack so additional caulk can get down into that crack and seal it up properly. Also, I believe the Dicor instructions say when putting new caulk over existing caulk you should cover all the old caulk (i.e. totally entombing it) and extend the new caulk like an inch beyond the old onto virgin surfaces which is often not feasible especially around most roof penetrations along the interior edge of the old caulk.
I would not trust any RV service center to seal anything on my camper cause I would not trust that they would do a good job and are grossly overpriced for the minimalist job they might do. To remove all the old caulk and apply Eternabond properly can be a tremendous time consuming project and take just two to three hours to completely remove all existing caulk around a single vent and then properly prep and apply Eternabond, but it's a one time thing and IMO is the only 100% sure way of having a leak free roof. Also, IMO it's almost impossible to really properly check the condition of normal caulking on the roof unless you physically poke along every edge to ensure it is still properly adhered to the roof whereas with Eternabond a quick visual look will tell you immediately if every inch is still properly adhered along all the tape edges.
Take a look at your roof and then look thru the following album detailing all my Eternabond sealing on my trailer and decide for yourself which is the better way to go. BTW those pics are 8 years old and my roof while dirtier, the Eternabond still looks like I put it on yesterday.
Eternabond Install
Larry
RAINKAP INSTALL////ETERNABOND INSTALL
- Mark as New
- Bookmark
- Subscribe
- Mute
- Subscribe to RSS Feed
- Permalink
- Report Inappropriate Content
Aug-29-2016 06:39 PM
I'm a man, but I can change, if I have to, I guess." Red Green
- Mark as New
- Bookmark
- Subscribe
- Mute
- Subscribe to RSS Feed
- Permalink
- Report Inappropriate Content
Aug-26-2016 06:58 PM
- Mark as New
- Bookmark
- Subscribe
- Mute
- Subscribe to RSS Feed
- Permalink
- Report Inappropriate Content
Aug-26-2016 05:54 PM
- Mark as New
- Bookmark
- Subscribe
- Mute
- Subscribe to RSS Feed
- Permalink
- Report Inappropriate Content
Aug-25-2016 05:20 AM
There's going to be a lot of different answers to your questions because of the nebulous term "reseal". I'd suggest to make the dealer explain what they are going to do. In fact, that is a good strategy with any service being done on anything.
Good point.
I've never applied a rubber roof coating on my 20 year old 32' 5er.
I do a twice a year sealant check.......roof jacks and other fixtures check. I've never reseal the whole roof as its simply not needed.
I know what to look for when checking sealant up there. All I've ever done is add a bit of Dicor over hairline cracks in the sealant without making a dam for water to sit in. I've had a few places the old sealant started coming loose so I pull off what comes off and reseal.
This unit has never leaked which they won't when properly maintained.
Some rv owners would be better off to pay the dealer for this service
if they don't know what to look for or how to properly seal/reseal a rv.
'03 2500 QC Dodge/Cummins HO 3.73 6 speed manual Jacobs Westach
'97 Park Avanue 28' 5er 11200 two slides
- Mark as New
- Bookmark
- Subscribe
- Mute
- Subscribe to RSS Feed
- Permalink
- Report Inappropriate Content
Aug-24-2016 07:26 PM
2021 KZ Connect SE 312BHKSE
Me (DH), DW, 3 boys, 3 girls
- Mark as New
- Bookmark
- Subscribe
- Mute
- Subscribe to RSS Feed
- Permalink
- Report Inappropriate Content
Aug-22-2016 01:20 PM
- Mark as New
- Bookmark
- Subscribe
- Mute
- Subscribe to RSS Feed
- Permalink
- Report Inappropriate Content
Aug-22-2016 09:26 AM
It is a bit tedious to do, but can be done if you are decently handy and feel up to the task. Materials wise, you can expect anywhere from 8-14 tubes of self leveling dicor. It will vary according to how heavy you lay it on, and how many items you have stuck through your roof (vents, etc).
I have done a couple. I personally went with eternabond tape over all my seams, so I never have to worry about the sealing on my roof again.
Materials for eternabond will be less that what you will spend at the dealer. Plan on a couple of good weekends to apply it correctly, but it is so worth it in the end.
2011 F150 Ecoboost SCREW 145" 4x4
Firestone Ride-Rite Air Springs/Air Lift Wireless Controller
2006 Sportsmen by KZ 2604P (30')
Hensley Arrow
- Mark as New
- Bookmark
- Subscribe
- Mute
- Subscribe to RSS Feed
- Permalink
- Report Inappropriate Content
Aug-22-2016 08:55 AM
- Mark as New
- Bookmark
- Subscribe
- Mute
- Subscribe to RSS Feed
- Permalink
- Report Inappropriate Content
Aug-22-2016 08:21 AM
Is it really needed? Probably not. But, it worked great for me.
- Mark as New
- Bookmark
- Subscribe
- Mute
- Subscribe to RSS Feed
- Permalink
- Report Inappropriate Content
Aug-22-2016 06:47 AM
Dutchmen Kodiak 24RBSL if that matters
- Mark as New
- Bookmark
- Subscribe
- Mute
- Subscribe to RSS Feed
- Permalink
- Report Inappropriate Content
Aug-22-2016 05:48 AM
deltabravo wrote:
Search YouTube for videos.... lots of good stuff there.
this!
i dont own a TT yet but after doing days of research i have a new idea of what is being discussed. no it wont make you a pro but i will give you an idea of what is being talked about, and some even have the steps. the only thing you don't get is the time involved.
for instance one guy took 6 days and 30 hours for the guy to replace a part. but, still its knowledge. its priceless none the less.
- Mark as New
- Bookmark
- Subscribe
- Mute
- Subscribe to RSS Feed
- Permalink
- Report Inappropriate Content
Aug-20-2016 07:30 PM
2015 Jayco 29QBS


