- Good Sam Community
- Groups
- Motorhome Group
- Forum
- Re: Ooops! Now to fix it ...
- Subscribe to RSS Feed
- Mark Topic as New
- Mark Topic as Read
- Float this Topic for Current User
- Bookmark
- Subscribe
- Mute
- Printer Friendly Page
Ooops! Now to fix it ...
- Mark as New
- Bookmark
- Subscribe
- Mute
- Subscribe to RSS Feed
- Permalink
- Report Inappropriate Content
Dec-14-2014 08:15 AM
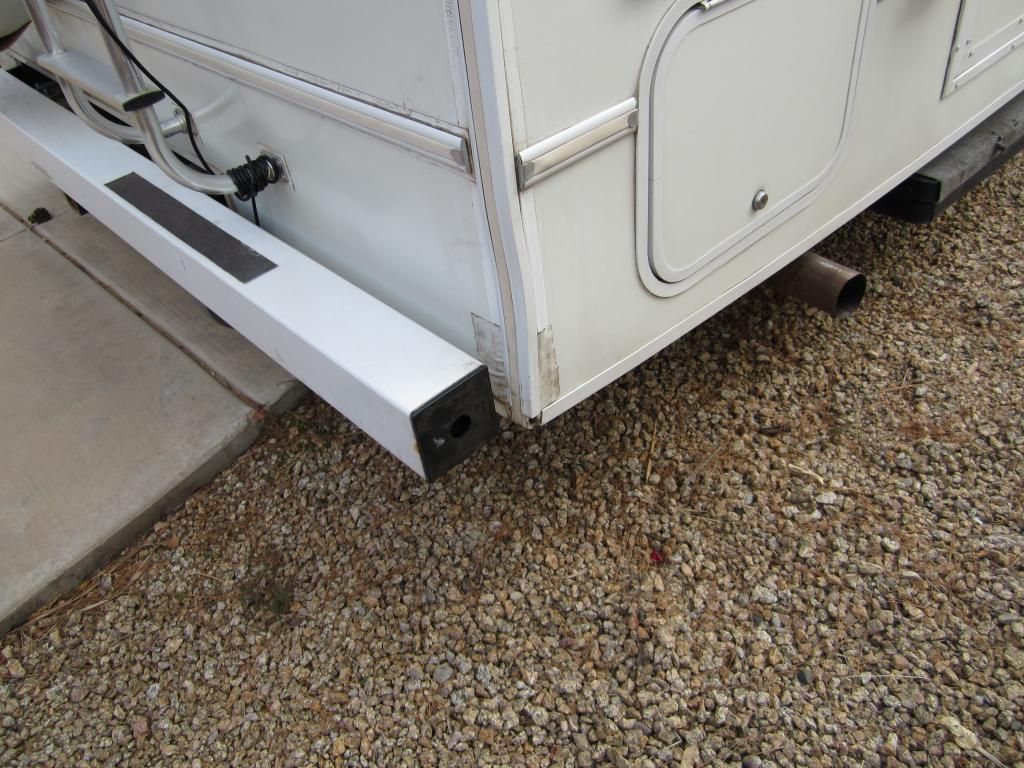
It may be that I need to do something quick and dirty now with a more definitive repair in the spring, as I live in New England and the "nice" weather is not going to last much longer ... I'm more worried about preventing further damage than I am about cosmetics.
I've never tried to load an image, hope this works ...
My first RV, 1998 Coachmen 22RK, Ford E350 V10 Triton
- Labels:
-
Class C
- Mark as New
- Bookmark
- Subscribe
- Mute
- Subscribe to RSS Feed
- Permalink
- Report Inappropriate Content
Dec-15-2014 08:45 AM

- Mark as New
- Bookmark
- Subscribe
- Mute
- Subscribe to RSS Feed
- Permalink
- Report Inappropriate Content
Dec-15-2014 07:03 AM
- Mark as New
- Bookmark
- Subscribe
- Mute
- Subscribe to RSS Feed
- Permalink
- Report Inappropriate Content
Dec-15-2014 06:31 AM
- Mark as New
- Bookmark
- Subscribe
- Mute
- Subscribe to RSS Feed
- Permalink
- Report Inappropriate Content
Dec-15-2014 05:43 AM
This might sound a little "Out There" but you might want to try this.
1) Find a parking lot with a solid concrete lamp-post base.
2) Place properly sized lumber between the concrete and the place on your low-point rear wall where it pulled away.
3) Very slowly have your spouse or friend back up the rig while you hold the lumber in the right place for the right pressure point. Some practicing on extremely slow backing would be a good idea.
Let the rig creep extremely slowly without using the gas pedal until you see the separation start to close. It might just go back into the right position once relaxed. Then caulk and I'd think you are good as new.
Or you could just wedge a 2x4 between the bumper and the corner and pry it. Much easier, and safer.
'13 Keystone Bullet Premier 310BHPR
Hitched by Hensley
- Mark as New
- Bookmark
- Subscribe
- Mute
- Subscribe to RSS Feed
- Permalink
- Report Inappropriate Content
Dec-15-2014 04:39 AM
Good luck.
Life is a trip, ENJOY the ride.
Safe Travels.
2020 Lance 1172, our traveling rig
2013 Heartland Landmark Mesa, 40', fifth wheel, we keep at our snowbird home in central FL, Bushnell, FL.
2014 Chevy Silverado LTZ 3500HD, CC, 4x4, LB, duals, DuraMax
- Mark as New
- Bookmark
- Subscribe
- Mute
- Subscribe to RSS Feed
- Permalink
- Report Inappropriate Content
Dec-14-2014 07:26 PM

I took off the metal trim to the top but let it hang, then used 2 2" strips of eternabond overlapping the corner then rescrewed the trim using new stainless screws and replaced the vinyl strip.
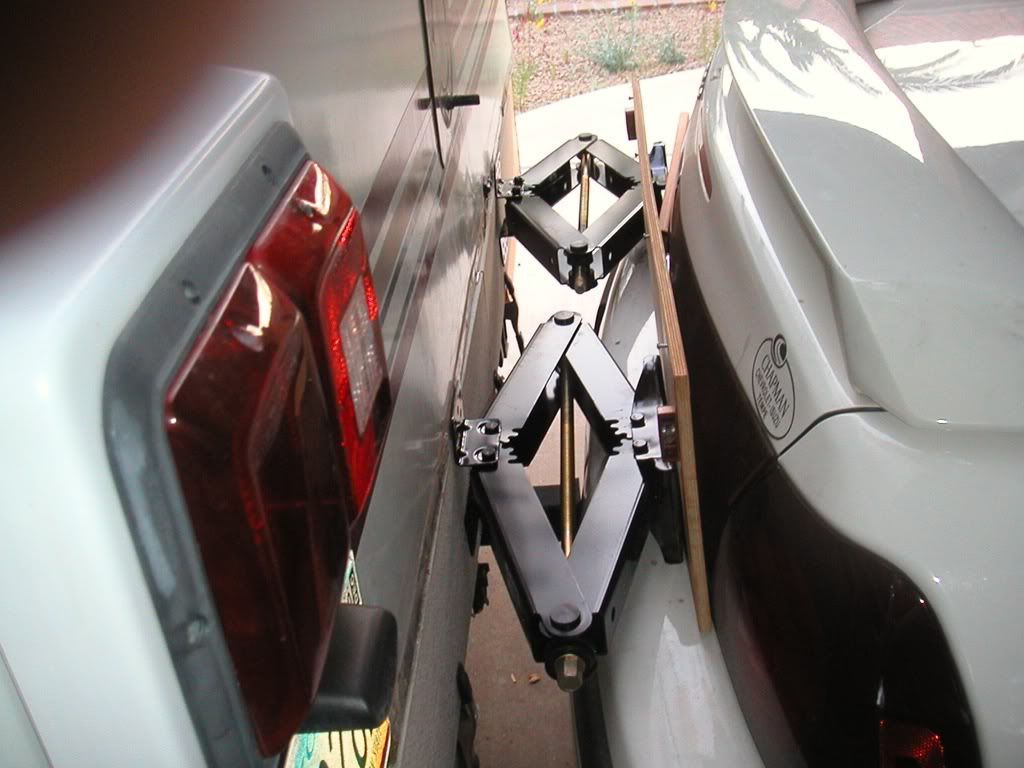
Another way to put pressure on to straighten or hold a glue joint is to use a scissor jack, you might have a couple to stabilize the RV when parked.
Ours were brand new here. We used the car to secure against because it was the right height. Here I was gluing the filon back on a lower area repair.

Former Rental Owners Club #137
2003 Itasca Spirit 22e 2009-2021
- Mark as New
- Bookmark
- Subscribe
- Mute
- Subscribe to RSS Feed
- Permalink
- Report Inappropriate Content
Dec-14-2014 04:07 PM
- Mark as New
- Bookmark
- Subscribe
- Mute
- Subscribe to RSS Feed
- Permalink
- Report Inappropriate Content
Dec-14-2014 03:30 PM
My first RV, 1998 Coachmen 22RK, Ford E350 V10 Triton
- Mark as New
- Bookmark
- Subscribe
- Mute
- Subscribe to RSS Feed
- Permalink
- Report Inappropriate Content
Dec-14-2014 03:22 PM
https://www.youtube.com/watch?v=ms2ba79OvRM
https://www.youtube.com/watch?v=Re19I08pvAQ
- Mark as New
- Bookmark
- Subscribe
- Mute
- Subscribe to RSS Feed
- Permalink
- Report Inappropriate Content
Dec-14-2014 02:40 PM
If it has the screws I'm talking about, the right way to do this includes getting some putty tape and applying it under the trim piece. Afterwards, it still would make sense to use some Proflex RV caulk or similar product on the upward facing lip of the trim piece.
In a pinch for now, buy some GOOD foil HVAC tape. It is great stuff. You can tape the edge into place with it, and maybe a dab of caulk on the top edge of the tape where it starts.
A mobile RV repair service could probably fix you up in 15 minutes.
- Mark as New
- Bookmark
- Subscribe
- Mute
- Subscribe to RSS Feed
- Permalink
- Report Inappropriate Content
Dec-14-2014 01:32 PM

2014 Forest River Berkshire 390RB
- Mark as New
- Bookmark
- Subscribe
- Mute
- Subscribe to RSS Feed
- Permalink
- Report Inappropriate Content
Dec-14-2014 01:17 PM
Our metal corner strip is held on with screws, so my "permanent" fix was to apply Dicor to the inside edges of the trim and screw it back in place. So far, so good.
- Mark as New
- Bookmark
- Subscribe
- Mute
- Subscribe to RSS Feed
- Permalink
- Report Inappropriate Content
Dec-14-2014 12:28 PM
ron.dittmer wrote:
This might sound a little "Out There" but you might want to try this.
1) Find a parking lot with a solid concrete lamp-post base.
2) Place properly sized lumber between the concrete and the place on your low-point rear wall where it pulled away.
3) Very slowly have your spouse or friend back up the rig while you hold the lumber in the right place for the right pressure point. Some practicing on extremely slow backing would be a good idea.
Let the rig creep extremely slowly without using the gas pedal until you see the separation start to close. It might just go back into the right position once relaxed. Then caulk and I'd think you are good as new.
I don't like this idea. Too much chance for further damage. The proflex should be fine. I would see if I could flex it open at the bottom by hand just enough to shoot some sealer in there and then run a couple of washer head screws into the back side of the trim to pull it closed followed by a dab of the sealer on the screw heads. It also would probably be a good idea to trim off that pointed end on the trim so you don't get hung up on it in the future. Things sticking out like that can cut you good. I know from first hand experience.
WD8CBT since 1976
32' Gulfstream Ameri-Camp & 05 Ram QC LB
I started with nothing and I still have most of it left
I never fail, I just succeed in finding out what doesn't work
- Mark as New
- Bookmark
- Subscribe
- Mute
- Subscribe to RSS Feed
- Permalink
- Report Inappropriate Content
Dec-14-2014 09:25 AM
1) Find a parking lot with a solid concrete lamp-post base.
2) Place properly sized lumber between the concrete and the place on your low-point rear wall where it pulled away.
3) Very slowly have your spouse or friend back up the rig while you hold the lumber in the right place for the right pressure point. Some practicing on extremely slow backing would be a good idea.
Let the rig creep extremely slowly without using the gas pedal until you see the separation start to close. It might just go back into the right position once relaxed. Then caulk and I'd think you are good as new.


